Quick Guide (TL;DR)
⚡ Fast Strategy
For most players (25K+ target): queue during Electromagnetic Storm, follow the outer-loop route, hold your map to find probes, and extract safely. That's it.
For Cantina Legend (70K target): all of the above, plus Spaceport specifically, top-of-the-hour queuing for a cooperative lobby, a clean route with no wasted steps, and ideally a friendly trio to split the map.
- Play during Electromagnetic Storm — check the event tracker for active windows
- Spaceport is best, Dam is second. Spaceport Electromagnetic runs once a day — queue at the top of the hour for the best lobby
- Circle the entire outside first, then cut inward — never zigzag between inside and outside
- Hold your map during the run — probe icons appear on the map and save huge amounts of time
- Named locations spawn probes in threes — if you see one, expect two more nearby
- Run in duos/trios — every probe anyone breaches counts toward your score
- Trios = best possible setup — split the map three ways in a friendly lobby. PvP is a serious hindrance
- Extract successfully — your score only counts if you make it out alive
Interactive Maps with Probe Locations
Click any map to open the interactive view with Arc Probe markers. Plan your route from your spawn point before or during your run.
How Arc Probes Work
Arc Probes are interactable objects that spawn across the map during Electromagnetic Storm conditions. Unlike husks, probes must be breached—you interact with them to trigger a short activation sequence. Once a probe is breached by any member of your squad, it counts toward everyone in the squad's trial score.
Probe Spawn Rules
Understanding how probes spawn is the single biggest skill advantage in this trial:
- Named locations spawn in groups of three. Major areas like Fuel Storage, Fuel Processing, Fuel Lines, Jang Soo, and similar named POIs will almost always have exactly three probes if they have any at all. If you find one, start looking for the other two.
- Crashed probes are different. Outside major named zones, you can find isolated "crashed probes" that may spawn alone or in pairs—not always as a group of three. Don't waste time hunting a missing third if you're in an open area between POIs.
- Probe icons appear on your map. Holding your map open while moving through probe-dense areas shows small icons that reveal nearby probes. This is one of the most valuable mechanics for this trial and saves enormous amounts of time compared to visually sweeping every area.
💡 Use Your Map Constantly
Holding your map open while running through an area lets you spot probe icons in real time—even through walls and across short distances. Make this a habit at every named location. It's the fastest way to confirm whether probes are present without physically running to every spawn point.
Breaching & Score Credit
You can open a probe that has already been breached and looted by someone else, and it still counts toward your score. The probe doesn't need to have loot in it — the act of opening it is what triggers the score. This is crucial: without this mechanic, getting any meaningful score would be nearly impossible since other players will have already been through most of the map before you reach it. You'll regularly arrive at a probe to find it empty, and that's fine — open it anyway.
Within your squad, every probe any squad member breaches counts toward everyone's score. This is what makes duos and trios so powerful for this trial — you split the map but share the full combined total. Note that this only applies to your squad (the duo or trio you queued with) — other players in the match do not contribute to your score. A match full of other probe farmers is still a good thing, but only because it means less PvP aggression, not because their breaches count for you.
⚠️ You Must Extract
Your trial score only registers if you successfully extract from the match. Dying before reaching an extraction point resets your round's progress to zero. Keep this in mind when deciding whether to engage Arc enemies that are blocking your path — often the faster play is to use mobility tools or wait for a gap rather than fighting through.
Best Maps & When to Play
🥇 #1: Spaceport — Electromagnetic Storm
- Why it's best: Spaceport has the highest probe density of any map, and the Electromagnetic Storm event gives you the largest, most competitive probe-farming window
- Critical timing: Spaceport Electromagnetic only runs once per day. Queue at the top of the hour when it goes live — most players in that window are there to farm probes, so you're less likely to run into PvP aggression
- Downside: High demand means busier matches. Plan your route and move with purpose
🥈 #2: Dam Battlegrounds — Electromagnetic Storm
- Why it's good: The second-best map for this trial. A solid fallback option if you can't make Spaceport's daily window
- Easier to clear: Dam is generally considered somewhat easier to navigate than Spaceport, though the Testing Index area contains leapers and rocketeers that require wolf packs or photoelectric cloak to deal with efficiently
- Check the schedule: Use the event tracker to find when Dam Electromagnetic is active
💡 Queue at the Top of the Hour
Dedicated trial players plan their sessions around the Electromagnetic Storm schedule. When Spaceport or Dam Electromagnetic goes live, most players queuing at that moment are there to farm probes — not to hunt other players. Joining at the start of the event window gives you the best chance of a low-aggression match where you can focus on your route without worrying about PvP.
Loadout for Probe Runs
Speed and survivability are the priorities. You're covering massive amounts of ground over 40 minutes, constantly moving between probe locations. Combat is a last resort—every second spent fighting is a second you're not breaching probes.
⚠️ Time Is the Real Constraint
Every decision in this trial comes down to time. Saving two seconds here and three seconds there adds up to a full extra minute over a run — that's one or two more probes, which is often the difference between a good score and a record score. Use ziplines to skip long climbs, use photoelectric cloak instead of fighting when possible, and resist the urge to chase PvP or pick up loot unless it's directly on your path.
Route Strategy
The Core Rule: Circle Outside First, Then Cut In
The most important routing principle for this trial is never zigzag between inside and outside areas. Instead, fully circle the outer edge of the map to hit all exterior probe spawns, then sweep inward to the interior zones. This eliminates backtracking and keeps your movement efficient.
- Note your spawn location immediately. Your spawn point determines where your outer loop begins and ends — adjust the route shown below to start from wherever you drop in.
- Identify the last active extract early. Check which extraction point will be available until the end of the round and plan your final probe cluster to be close to it, so you can extract at the last possible second without a long run.
- Circle the entire outer perimeter of the map, hitting all exterior named zones (fuel storage, parking areas, perimeter POIs) as you go.
- Don't detour inward during your outer loop — stay on the outside until you've completed the full circle back to your starting area.
- Then sweep inward, tackling interior zones like trenches, central facilities, and high-Arc areas. Leave these for last because other players are more likely to have already breached interior probes by this point, reducing the Arc danger from freshly-aggroed enemies.
- Monitor your map constantly. Holding the map open lets you spot probe icons in real time and skip areas with no spawns.
⚠️ Adapt to Your Spawn & Extract
The routes shown below are reference routes assuming a specific starting point. Your spawn and the available extract will change every match — adjust your loop direction and endpoint accordingly. The key principle stays the same regardless of spawn: complete the outer ring first, then cut inward, and always finish near your extract.
Spaceport Route
Circle the full exterior — Staff Parking, Fuel Lines, Fuel Storage, Fuel Processing, and all perimeter POIs — before cutting into the Trenches and central zones. The interior is the hardest section due to dense Arc concentration around freshly-breached probes. If you're in a trio, assign one player to the interior while the others handle the exterior — they'll deal with the Arc aggro and you arrive to a calmer area.
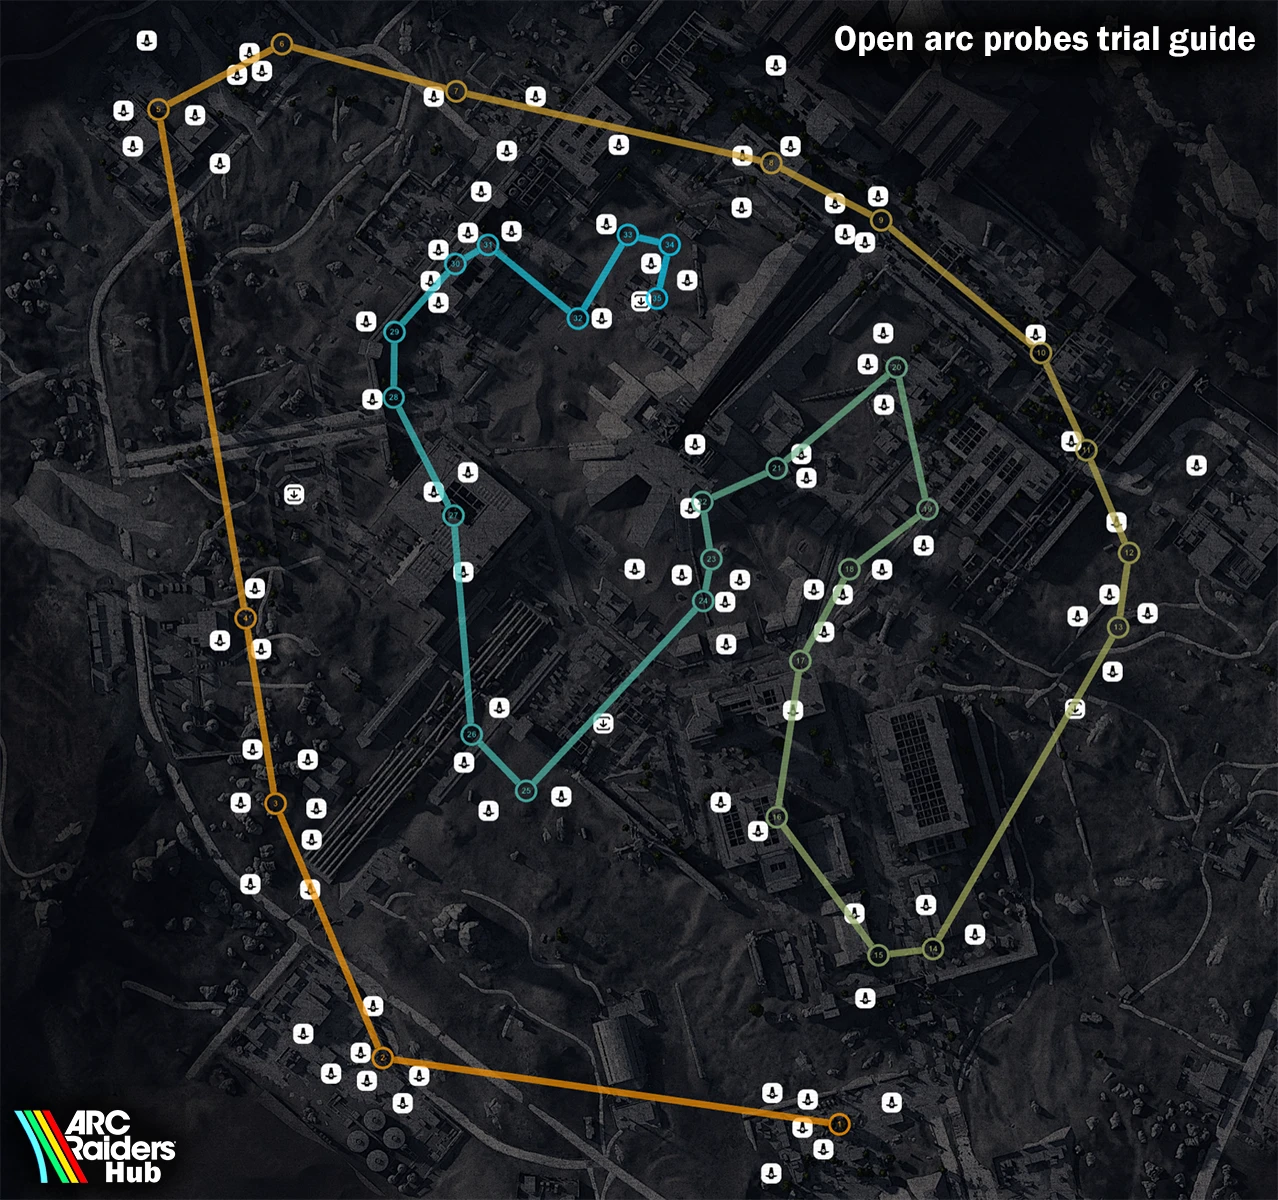
Spaceport probe locations and suggested outer-loop route. Adjust your start and endpoint based on your spawn and the available extract (click to enlarge).
💡 Use the Interactive Map to Build Your Own Route
Our Spaceport interactive map has all probe locations marked and lets you build and save custom routes directly in the browser. Plan your loop before a match, save it, and pull it up mid-raid. You can also use it to check exact POI layouts when you're unsure whether an area has probes on your current run.
Dam Battlegrounds Route
Dam follows the same outer-loop principle but the layout is more compact. The key danger zone is the Testing Index area, which has leapers and rocketeers — bring wolf packs for these specifically. The overall Dam route is somewhat simpler than Spaceport, but the probe density is lower, so scores tend to cap a bit below Spaceport's ceiling.
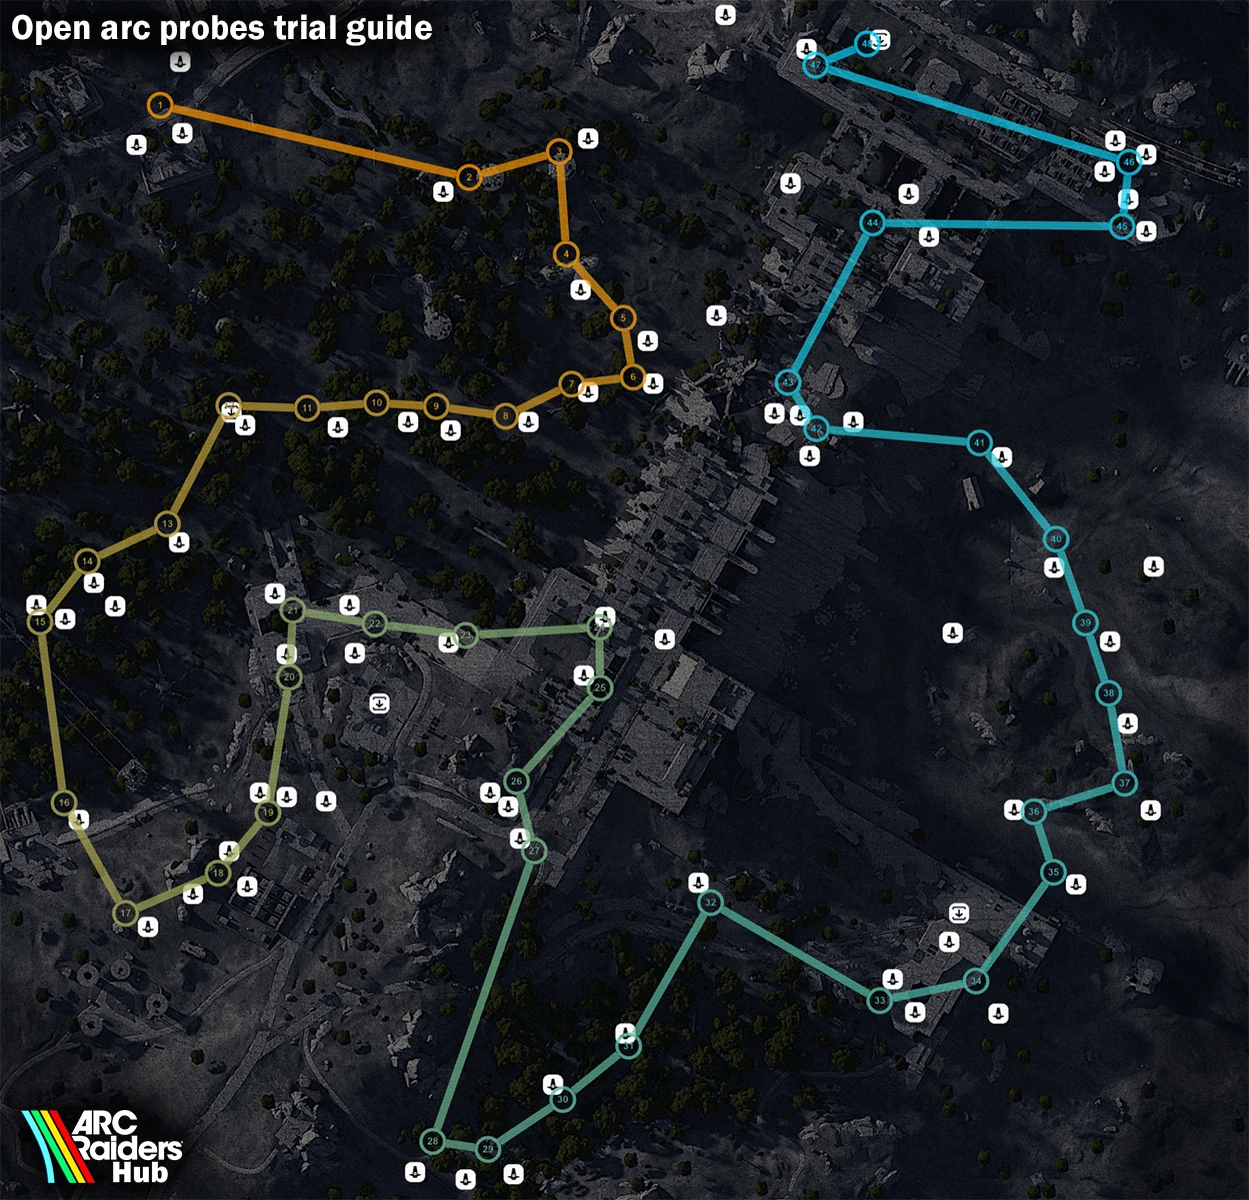
Dam Battlegrounds probe locations and suggested route. As always, adjust from your actual spawn and plan your exit toward the final extract (click to enlarge).
Trio Strategy: The Highest Ceiling
If you can get into a friendly trio lobby during Spaceport Electromagnetic, this trial becomes dramatically easier — and your score ceiling goes up substantially. The reason comes down to one rule: all probe breaches count for every team member, regardless of who does the breaching.
How Trio Scoring Works
With three players splitting the map, your squad covers three times the ground in the same amount of time. Every probe any teammate breaches adds to your score exactly as if you breached it yourself. So instead of one player racing around the entire map, each player handles a third — and everyone walks out with the combined total.
🎯 Ideal Trio Split — Spaceport
- Coordinate immediately after spawn — all three players start at the same location, so quickly decide who covers which section before anyone moves
- Split into three zones — outer left, outer right, and interior/center. The player most comfortable dealing with Arc handles the interior
- Don't overlap routes — racing to the same probes wastes both players' time. Communicate if you're heading into a zone
- Communicate the extract — make sure everyone is heading toward the final extract with time to spare. One player getting killed means they get zero score
What About PvP Lobbies?
PvP is the biggest hindrance to this trial. Every second spent in a fight is a second not breaching probes, and every death means zero score for that round. In hostile lobbies:
- Avoid engaging whenever possible. Use photoelectric cloak to disengage and reposition rather than committing to a fight
- Don't chase kills — even if you win the fight, you've lost 30–60 seconds that could have been several probes
- Stick together if it's hot — a trio that stays grouped can deter most ambushes without needing to stop and fight
- Consider waiting for a better lobby — if you repeatedly land in high-aggression matches, queuing at the top of the Electromagnetic hour usually gets you into a lobby with more players focused on the trial
⚠️ Solo in a PvP Lobby Is the Worst Case
Solo play in an aggressive lobby combines two disadvantages: no teammates breaching probes on your behalf, and the constant threat of getting killed before you can extract. If you're regularly landing in PvP lobbies while solo, your best move is to queue at exactly the right time to find a friendlier lobby rather than grinding unfavorable matches.
Key Tips & Common Mistakes
Use the map — It Changes Everything
Holding your map open near probe-heavy zones shows small probe icons on the map. This tells you instantly whether probes are present in an area without needing to physically check every corner. Players who don't know about this tip waste minutes per run hunting spawns that aren't there.
Don't Hunt Missing Probes in Crashed Spawns
Named POIs have a strong three-probe pattern, but isolated crashed probe spawns between locations can be just one or two. If you've found one or two probes at a non-named location and your map shows nothing else nearby, move on — don't spend 30 seconds sweeping an empty area hoping for a third that may not exist.
Coordinate the Extract
In the final minutes of a match, coordinate with your squad about extract timing. Ideally, one squad member calls the extract so it's active while the others breach the last few nearby probes — then everyone extracts at the last moment to maximize the count. A few extra probes in the final minute can meaningfully push your score.
Split Up, Don't Overlap
Since all breaches count for every squad member, the worst thing a duo or trio can do is run the same route. The moment you spawn, split into different sections of the map so your combined coverage is as wide as possible. Every probe your squadmate breaches on the other side of the map goes directly into your score too.
💡 25K+ Is the Normal Target — 70K Is for Cantina Legend
Don't feel pressured to optimize for 70K unless you're specifically chasing the Cantina Legend rank. A straightforward probe run during Electromagnetic Storm — outer loop, hold your map, extract alive — will comfortably clear 25K for most players without needing a perfect route or a coordinated lobby.
⚡ What a 70K+ Run Requires (Cantina Legend Push)
- Good spawn and extract position — ideally on the outer edge with a short run to begin your loop
- Strong probe RNG — most major POIs having probes spawned
- Squad coverage — in a trio, one player handles the interior while the others sweep the exterior, so the Arc aggro from interior breaches is already dissipating when you arrive
- Clean routing — no zigzagging, efficient use of ziplines and snap hook for vertical movement
- Minimal Arc delays — wolf packs and photoelectric cloak used to skip obstacles rather than fighting through them
Track Electromagnetic Storm Times
This trial is only worth running during Electromagnetic Storm. Spaceport Electromagnetic runs once per day, and Dam Electromagnetic has its own schedule — knowing exactly when each window opens lets you plan your session and queue at the right moment.
Our event tracker shows you everything you need:
- Which conditions are live right now — see at a glance if Spaceport or Dam Electromagnetic is currently active
- Upcoming schedule with countdowns — plan your day around the next Spaceport Electromagnetic window so you can queue at the top of the hour
- Event duration timers — know how much time is left in the current window before it closes
Summary: Your 70K+ Checklist
✅ Quick Reference
- Check the event tracker — queue for Spaceport Electromagnetic at the top of the hour
- Load your loadout — light shield, adrenaline, ziplines, wolf packs, photoelectric cloak, snap hook
- Note your spawn and begin your outer loop immediately
- Circle the outside first — complete the full outer perimeter before going inward
- Hold your map near every POI to spot probe icons before committing to a detour
- Look for threes at named locations — one probe means two more nearby
- Leave interior zones for last — let the other raiders reduce Arc density before you sweep through
- Manage the extract — have someone call it so you can probe right up to the last second
- Extract successfully — no score without extracting
Remember: 25K+ is easily doable for most players — only worry about pushing toward 70K if you're chasing Cantina Legend rank. Either way, only your best weekly score counts, so one good run is all you need.
Frequently Asked Questions
Does a probe count if someone else already opened it?
Yes — and this is one of the most important mechanics in this trial. Even if a probe has already been breached and fully looted by another player, interacting with it still gives you the score. Don't skip empty probes. You'll arrive at most of them already opened, and that's expected — open them anyway.
Do my squadmates' breaches count toward my score?
Yes, but only within your squad (the duo or trio you queued in with). Every probe any squad member breaches counts toward everyone in the squad's score. Players outside your squad do not contribute — the benefit of a match full of probe farmers is less PvP, not shared scoring.
What is the best map for Open Arc Probes?
Spaceport during Electromagnetic Storm is the best map by a clear margin. It has the highest probe density, and its once-daily Electromagnetic window concentrates the most dedicated trial players into the same lobbies. Dam Battlegrounds is the second-best option if you can't make the Spaceport window.
How often does Spaceport Electromagnetic run?
Once per day. Use the event tracker to see exactly when it's active so you can plan your session around it.
Why do big locations always have three probes?
Major named POIs (Fuel Storage, Fuel Lines, Fuel Processing, Jang Soo, etc.) have a strong three-probe cluster pattern when Electromagnetic probes spawn there — roughly an 85% chance of three if you see one. Smaller or unnamed areas with crashed probes don't follow this pattern and may have just one or two.
Should I fight Arc enemies on my route?
Only when you have no choice. Use photoelectric cloak to escape aggro from dangerous enemies like rocketeers. Use wolf packs for leapers and rocketeers that are directly blocking a probe. Fighting wastes time and risks getting knocked before you can extract.
What happens if I die before extracting?
You lose all trial progress for that round. Your score only counts on a successful extraction. This is the single biggest reason to prioritize survival and avoid unnecessary PvP or Arc fights.
Is this trial better in a trio?
Significantly. A trio squad is the highest-ceiling setup for this trial. All three players split the map into thirds, and every probe any squad member breaches counts toward everyone's score. If you can coordinate a trio that all knows the route and splits up immediately on spawn, your combined output makes 70K+ much more achievable. The main downside is that group matches tend to have more PvP activity — as long as everyone stays focused on probes and avoids unnecessary fights, the score potential far outweighs the risk.
Can I run this trial solo?
Yes, solo is fully viable. You won't benefit from shared squad scoring, so you'll need to cover the map yourself — but a clean route during Spaceport Electromagnetic can still hit solid numbers. Queuing at the top of the hour puts you in a match where most other players are also farming probes, which means less PvP pressure and a safer run.
Good luck, Raiders. Plan your loop, hold your map, and extract clean.
//-Arc Raiders Hub
💬 Share Your Best Score!
Join our Discord community to share your probe run scores, compare routes, and team up with other Raiders for coordinated Electromagnetic lobbies!
Join Discord Server