TL;DR — Quick Guide
⚡ Fast Strategy
- Queue during Hidden Bunker on Spaceport. 40-minute run time, highest firefly density near the Arrival building and trench towers, and it counts toward both the Fireflies and the Damage Flying Arc trials at the same time. Track it on the events page.
- Set up a zipline train from South Trench Tower to Arrival building. Traversal is stamina-free; this is why you take blue shield over green.
- Snipe fireflies with the Jupiter from rooftops — you get eyes on spawn points the moment they appear and can kill them before players at ground level react.
- Cycle ~5 spawn points around the Arrival–trench tower corridor: center triple spawn, outside wall spawn, launch pad spawn, and the roaming spawn on the Arrival side.
- Kill hornets sitting on spawn nodes between cycles — they can block the next firefly from spawning at that location.
- Priority call: since other players are also running the Damage Flying Arc trial at the same time, they will target the fireflies too. Pick your priority — if you're going for the firefly score specifically, call your shot and take it fast.
- For the Damage Flying Arc trial side: bring snitch scanners (farmed beforehand), kill the called-in hornets with seeker grenades or wolf packs, or farm wasps — all count toward that trial.
- Wolf packs for rocketeers that slow your cycle, or to nuke a last-second firefly when the gate is closing.
- Coordinate the extract — ask players not to press the button early. An extra full minute is worth roughly two more fireflies (~1.7K damage).
Map View — Firefly Spawns & Zipline Route
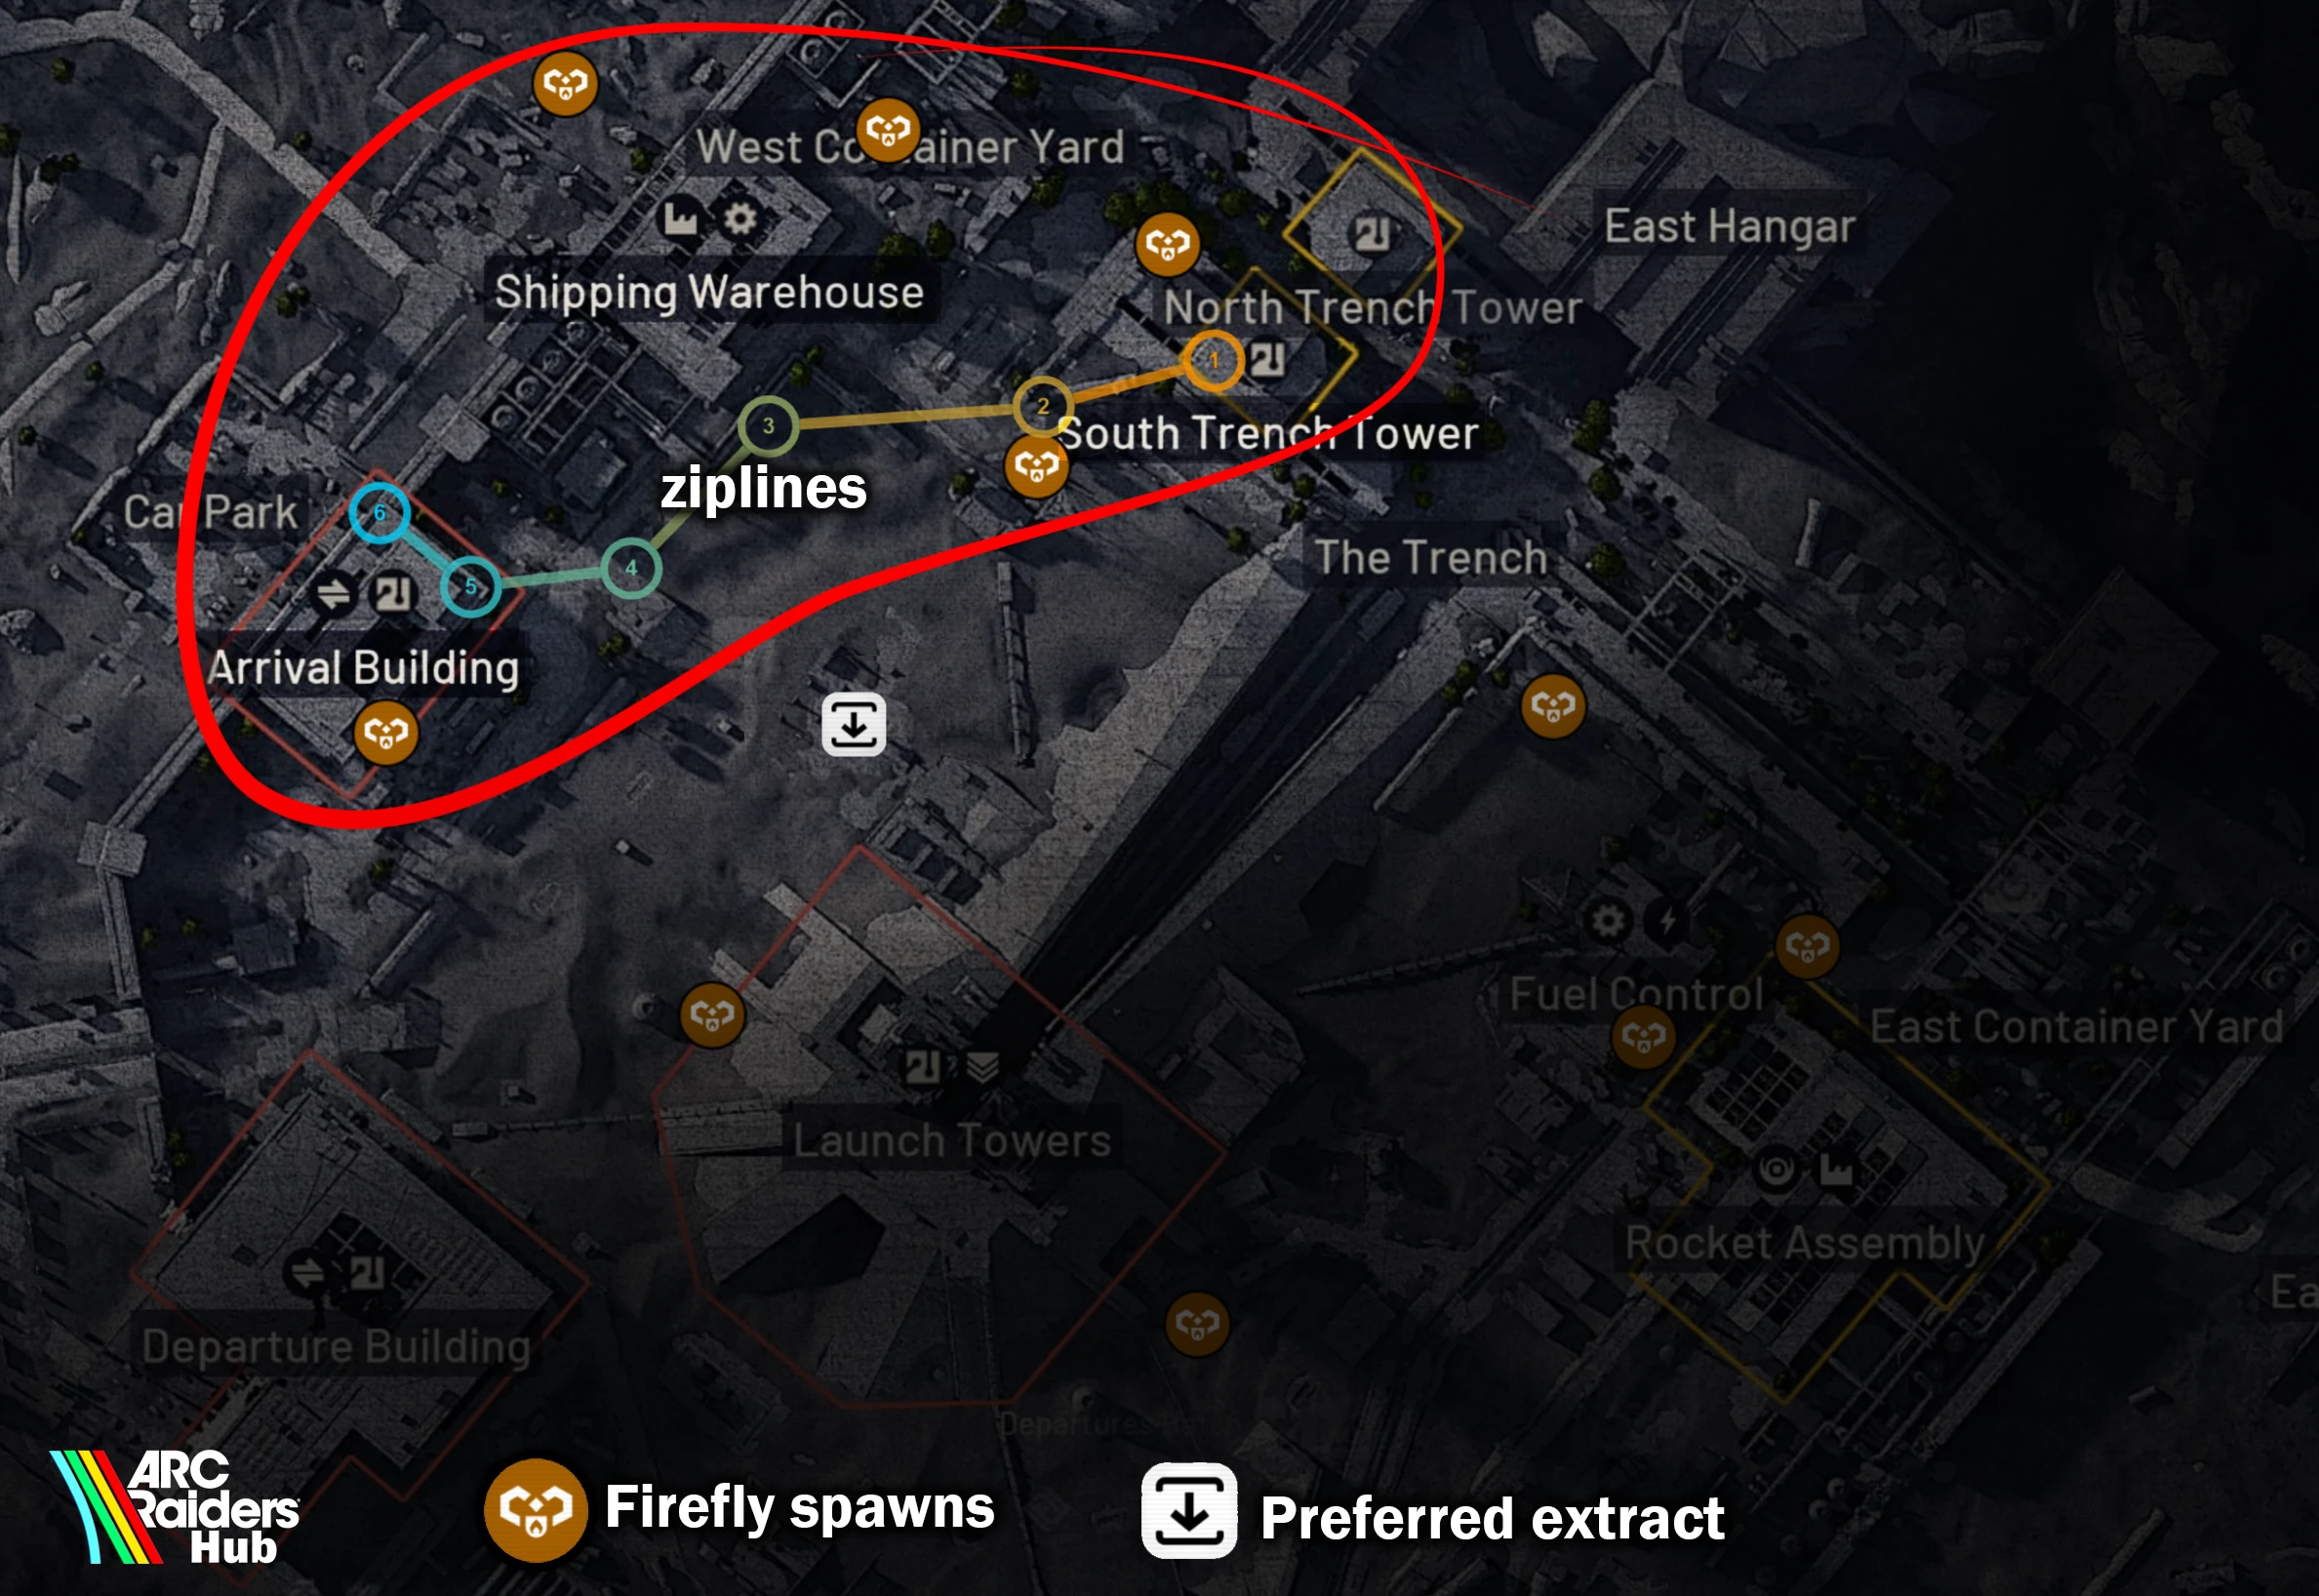
Spaceport — firefly spawns, zipline route, and ideal extract. Click to enlarge.
How Fireflies Behave
- Fixed spawn nodes. Fireflies appear at consistent locations each cycle. Memorizing these spots is the biggest skill advantage in this trial.
- Never called in by snitches. Every firefly you kill naturally spawned at its node — unlike hornets, you can't force them to appear. This is what makes the trial harder than the concurrent Damage Flying Arc objective, where any Arc enemy type counts.
- Hornets block spawn nodes. A hornet sitting at a firefly spawn point can prevent the firefly from appearing that cycle. Clear them with a couple of shots and move on — the Hullcracker is intentionally not in this loadout. You're sniping from elevation with the Jupiter, not fighting at close range.
- Spawn timing is inconsistent. Some nodes skip a cycle or spawn a hornet instead of a firefly. Recognize it early and don't wait for a spawn that isn't coming.
- ~880 damage per firefly. With ~5 nodes cycling over 40 minutes, maximizing each cycle is what separates a 20K run from a 28K+ run.
Why Spaceport — Hidden Bunker Event
Hidden Bunker is a Spaceport event, not a separate map. When it's active, the 40-minute run time gives you significantly more cycles compared to shorter events. The Arrival building and trench tower area concentrates the most visible firefly spawns of any section, all within range of a two-point zipline train. You can check when Hidden Bunker is live on the events page.
Running this during Hidden Bunker also means the concurrent weekly trial — Damage Flying Arc Inside Spaceport Walls — is live at the same time on the same 2X multiplier. Every firefly, hornet, or wasp you kill inside the walls contributes to that trial too. One run, two trials progressed simultaneously.
💡 Other Map Options
Buried City is a decent alternative for the Damage Flying Arc trial — good arc density, viable if Hidden Bunker isn't available. However, Buried City doesn't have a Hidden Bunker equivalent event (no 40-minute window), so look for Close Scrutiny or Night Raids events there instead. Check the events page for active windows across all maps.
Bluegate is viable but has fewer visible firefly spawns from a single elevated position — more travel per kill compared to the Arrival corridor on Spaceport.
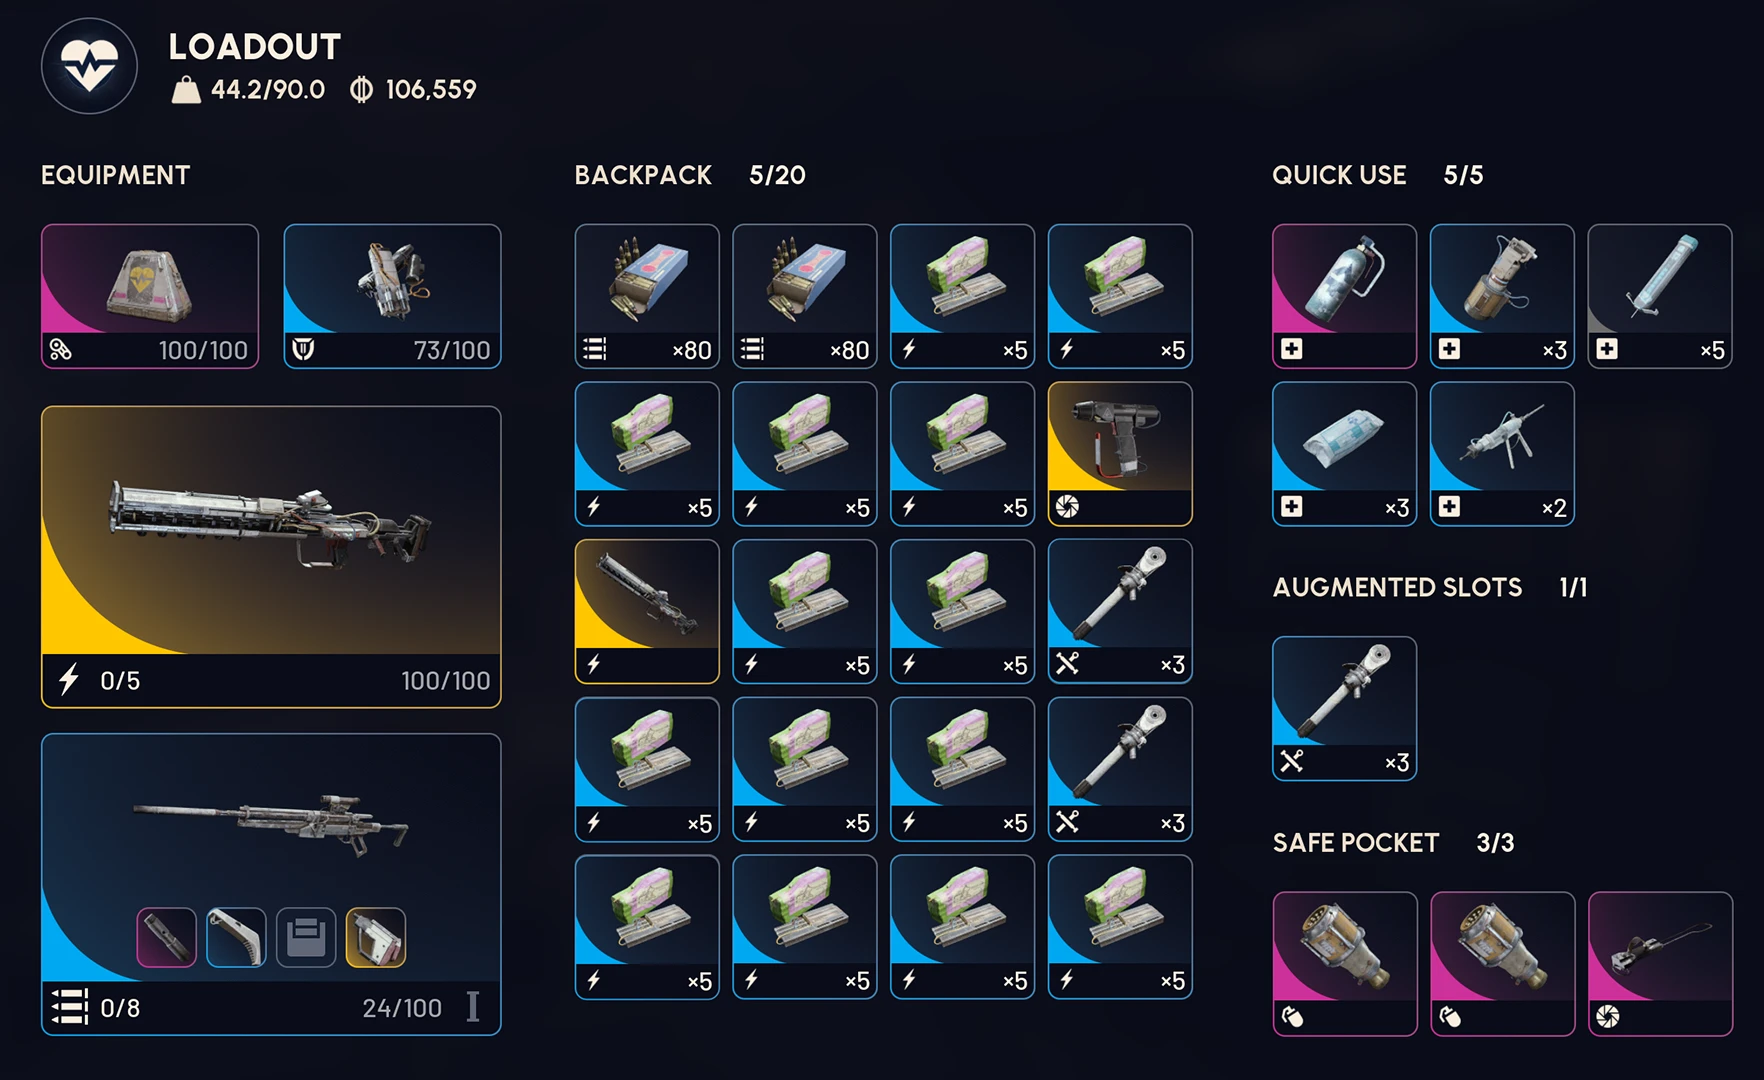
Loadout
Firefly Spawn Locations
All key spawn points are within the corridor between South Trench Tower and the Arrival building — inside the Spaceport walls. Approximately 880 damage per firefly. Other players will also be watching these locations, especially from rooftops — getting elevated early on the zipline train lets you react to spawns faster than players at ground level.


⚠️ Clear Hornets From Spawn Nodes
A hornet sitting on a spawn node can block the next firefly from appearing at that location. Kill them quickly between cycles — a few shots is enough. Don't chase them off the node; just eliminate them and get back to watching the corridor.
Full 28K+ Solo Run
Full run demonstrating the zipline setup, spawn cycling, and how to pick fireflies out of mixed packs. The map overview at the end walks through each spawn location and the zipline route. Credit goes to Valliate for the video
Good luck, Raiders. Set up your train, watch the spawns, and extract clean.
//-Arc Raiders Hub
Share Your Score!
Hit a new personal best on the Fireflies trial? Share your run and compare routes with other Raiders in our Discord.
Join Discord Server