Quick Guide (TL;DR)
Fast Strategy for 20K+ Points
- This trial only happens during Locked Gate event on Blue Gate - check event tracker
- Each mine = 300 points - you need ~70 mines for 20,000+ points
- Mines spawn in 4 clusters near security key locations: Raider's Refuge, Pilgrim's Peak, Reinforced Reception, Ancient Fort
- Strategy: Clear closest cluster first - many Raiders compete for mines, so hit your nearest cluster completely before moving to the next
- Team play multiplies score: All points earned by any team member count for everyone. Split up and each player clears a different cluster
- Listen for beeping and look for red lights to identify active mines
- Step on mine, hold to disarm, don't move - stepping off = explosion
- Bring adrenaline shots and zip lines for speed between locations
Interactive Map with All Mine Locations
Click the map below to open the interactive Blue Gate map with mine location filters pre-enabled. Plan your route from your spawn point to hit all four security key areas.
What Are Buried Mines?
Buried Mines are pressure-sensitive explosives partially buried in the ground near points of interest. They're a permanent fixture on all maps in Arc Raiders, but they become the focus of a special weekly trial during the Locked Gate event on Blue Gate.
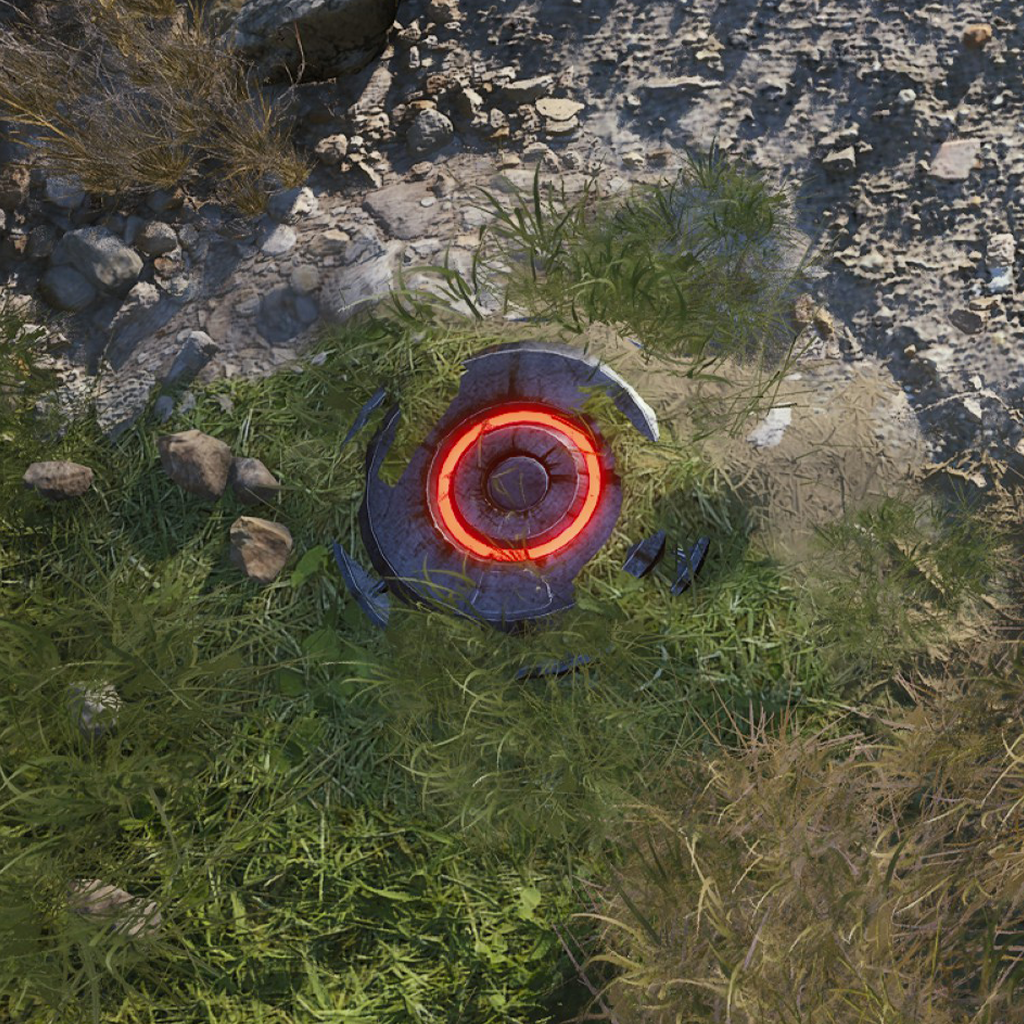
What a Buried Mine looks like - note the red light circle (click to enlarge)
How Buried Mines Work
- Activation: Mines are triggered when you step on them
- Visual Cue: Active mines emit a red light circle on the ground
- Audio Cue: They produce an audible beeping sound (crucial for finding hidden mines)
- Disarming: Once triggered, you must stay on the mine and hold the disarm button until complete
- Detonation: Stepping off before disarming completes or shooting the mine causes it to explode
Critical Rule: Don't Move While Disarming
Once you step on a mine and start the disarming process, do not move until it's complete. If you step off the mine before disarming finishes, it will detonate and deal significant damage or kill you. This also means you're vulnerable during the disarming animation—stay alert for enemies and ARCs.
Where Are the Mines on Blue Gate?
During the Locked Gate event, buried mines spawn near the four security key locations on Blue Gate. These are the same locations where you'd normally find security keys for the Locked Gate objective.
The Four Security Key Locations (Mine Zones)
During the Locked Gate event, mines spawn near these four security key locations:
- Raider's Refuge
- Pilgrim's Peak
- Reinforced Reception
- Ancient Fort
Pro Tip: Use Audio Cues to Find Hidden Mines
The beeping sound from active mines is essential for locating mines hidden in bushes, tall grass, or behind objects. When you arrive at a security key location, pause and listen carefully—you'll often hear mines before you see them. This is especially useful for finding mines other players have missed.
How to Disarm Buried Mines Safely
Disarming mines is straightforward, but requires careful execution to avoid taking damage or dying from explosions.
Step-by-Step Disarming Process
- Identify the mine: Look for the red light circle on the ground and listen for the beeping sound
- Step onto the mine: Walk directly onto the mine to trigger it
- Hold the disarm prompt: A prompt will appear instructing you to disarm—hold the button
- Stay still until complete: Do not move or the mine will detonate
- Move to the next mine: Once disarmed, immediately move to the next mine location
Be Careful While Sprinting and Jumping
When moving quickly between mine locations, pay close attention to where you're landing. If you jump or sprint and land directly on a mine without being ready to disarm it, you might panic and step off too early, causing an explosion. Move deliberately when you're in a mine zone.
What Causes Mines to Explode?
- Stepping off during disarm: Moving before the disarm completes triggers detonation
- Shooting the mine: Any weapon fire hitting the mine causes it to explode
- Explosions nearby: Grenades or other explosions can chain-detonate mines
Dealing with Enemies While Disarming
You're completely vulnerable during the disarming animation. If you see or hear enemies approaching, you have two choices: finish disarming and hope they don't shoot you, or step off the mine early (causing it to explode) and fight. In most cases, it's better to finish the disarm and reposition afterward—the explosion from stepping off will damage you and give away your position.
Best Loadout & Strategy for Mine Disarming
Success in this trial depends on speed and efficiency. Your loadout should prioritize mobility and survivability over heavy combat gear.
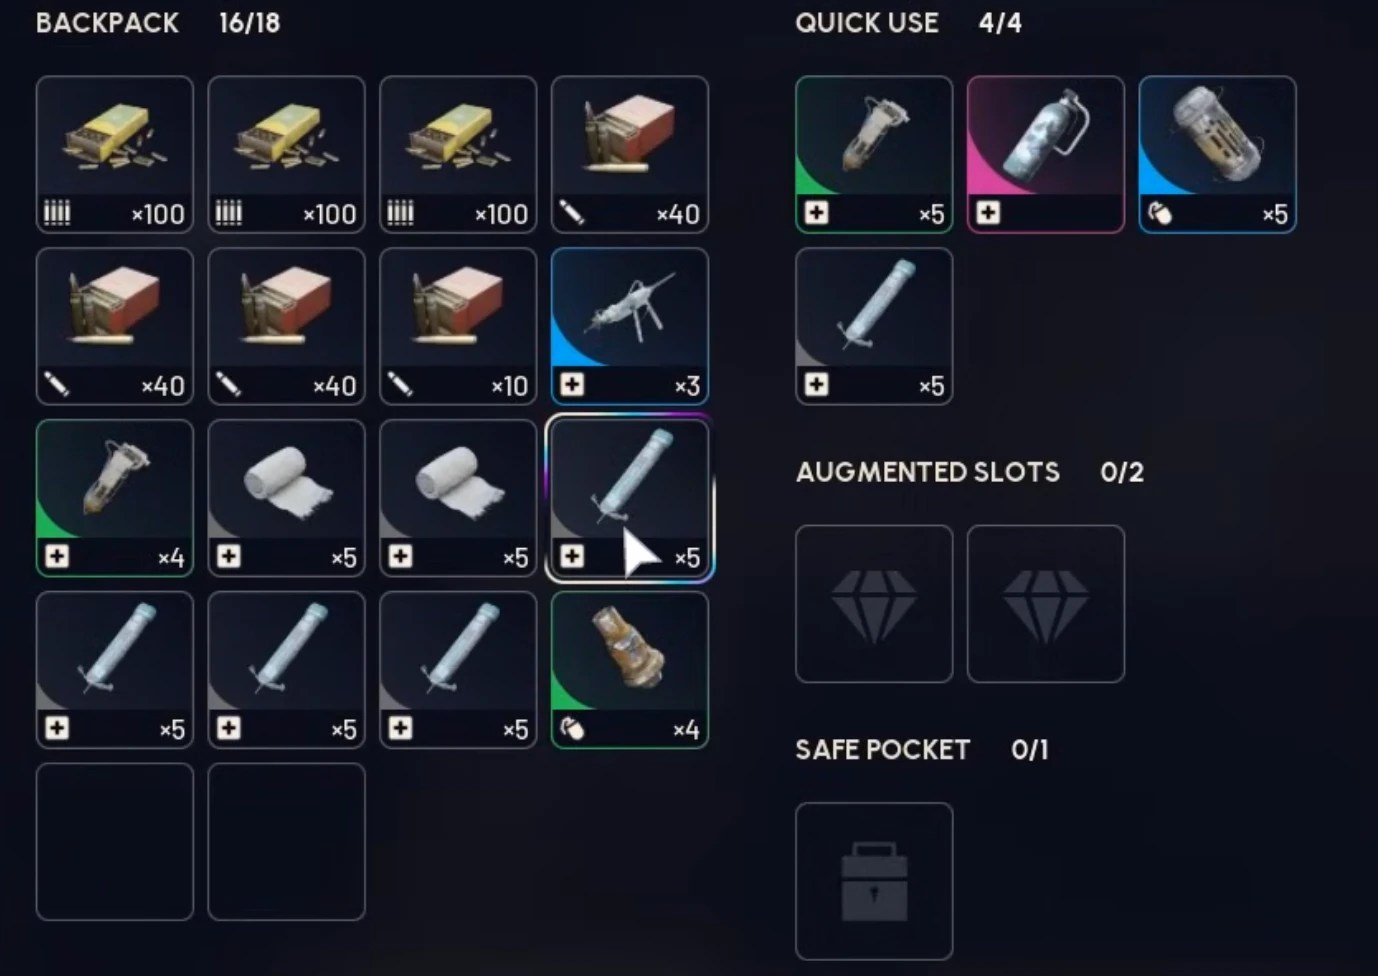
Example loadout with plenty of adrenaline shots, bandages, and seeker grenades (click to enlarge)
Recommended Loadout
| Item Type | Recommendation | Why |
|---|---|---|
| Adrenaline Shots | Bring as many as possible | Speed boost for faster travel between the four security key locations. Essential for covering ground quickly. |
| Zip Lines | Several zip lines | Blue Gate has varied terrain with elevation changes. Zip lines let you quickly cross gaps and hills between mine zones. |
| Seeker Grenades | A few grenades | For dealing with ARCs if you encounter them near mine locations. You want to avoid prolonged combat with robots. |
| Basic Weapon | Standard loadout weapon | For self-defense against other Raiders or stray ARCs. Anvils/stitchers are good choices. |
| Light Armor | Minimal armor | Prioritize mobility over protection. You're trying to avoid combat, not engage in it. |
Loadout Priority Summary
- Most important: Adrenaline shots for speed
- Very important: Zip lines for terrain traversal
- Important: Seeker grenades for ARCs
- Basic needs: Standard weapon + light armor
Strategy Tips
- Prioritize closest cluster first: Many Raiders compete for mines—clear your nearest cluster completely before moving on
- Move fast between locations: Use adrenaline shots liberally to cover ground quickly
- Listen for beeping: Audio cues are your best tool for finding mines other players missed
- Team play = split up: Each player should clear a different cluster. All points are shared
- Avoid prolonged PvP: Every second fighting is a second not disarming mines
- Watch for other players: If you see another Raider heading to your cluster, consider switching to a different one
- Stay aware during disarm: You're vulnerable while standing still on a mine
ARCs Near Mine Locations
ARCs often patrol near security key locations, and they'll be present during the Locked Gate event. If you encounter ARCs while disarming mines, use seeker grenades to quickly eliminate them rather than engaging in prolonged gunfights. The faster you clear threats, the faster you can return to disarming.
Scoring Breakdown & Route Planning
Understanding the scoring system and planning an efficient route are key to maximizing your weekly trial score.
How Scoring Works
| Action | Points Awarded |
|---|---|
| Disarm a Buried Mine | 300 points |
| Target: ~70 mines for 20,000+ points | |
Each buried mine awards 300 points when disarmed. To hit 20,000+ points, you need to disarm approximately 67-70 mines in a single 40-minute Locked Gate match.
The Mine Cluster Strategy
Priority: Hit Closest Cluster First
Since many Raiders are competing for the same mines during this trial, the most effective strategy is to identify the closest mine cluster to your spawn location and clear it completely before moving to the next closest cluster. This ensures you get maximum points from an area before other players arrive.
- Identify your spawn location when you load in
- Head immediately to the nearest security key location (mine cluster)
- Clear all mines in that cluster using audio cues to find hidden ones
- Move to the second-closest cluster and repeat
- Continue to third and fourth clusters as time allows
The Four Mine Clusters (Security Key Locations)
Mines spawn near these four security key locations on Blue Gate. Prioritize based on proximity to your spawn:
- Raider's Refuge - Northwestern section
- Pilgrim's Peak - Northest
- Reinforced Reception - between Raider's Refuge and Pilgrim's Peak
- Ancient Fort - Bottom middle of the map
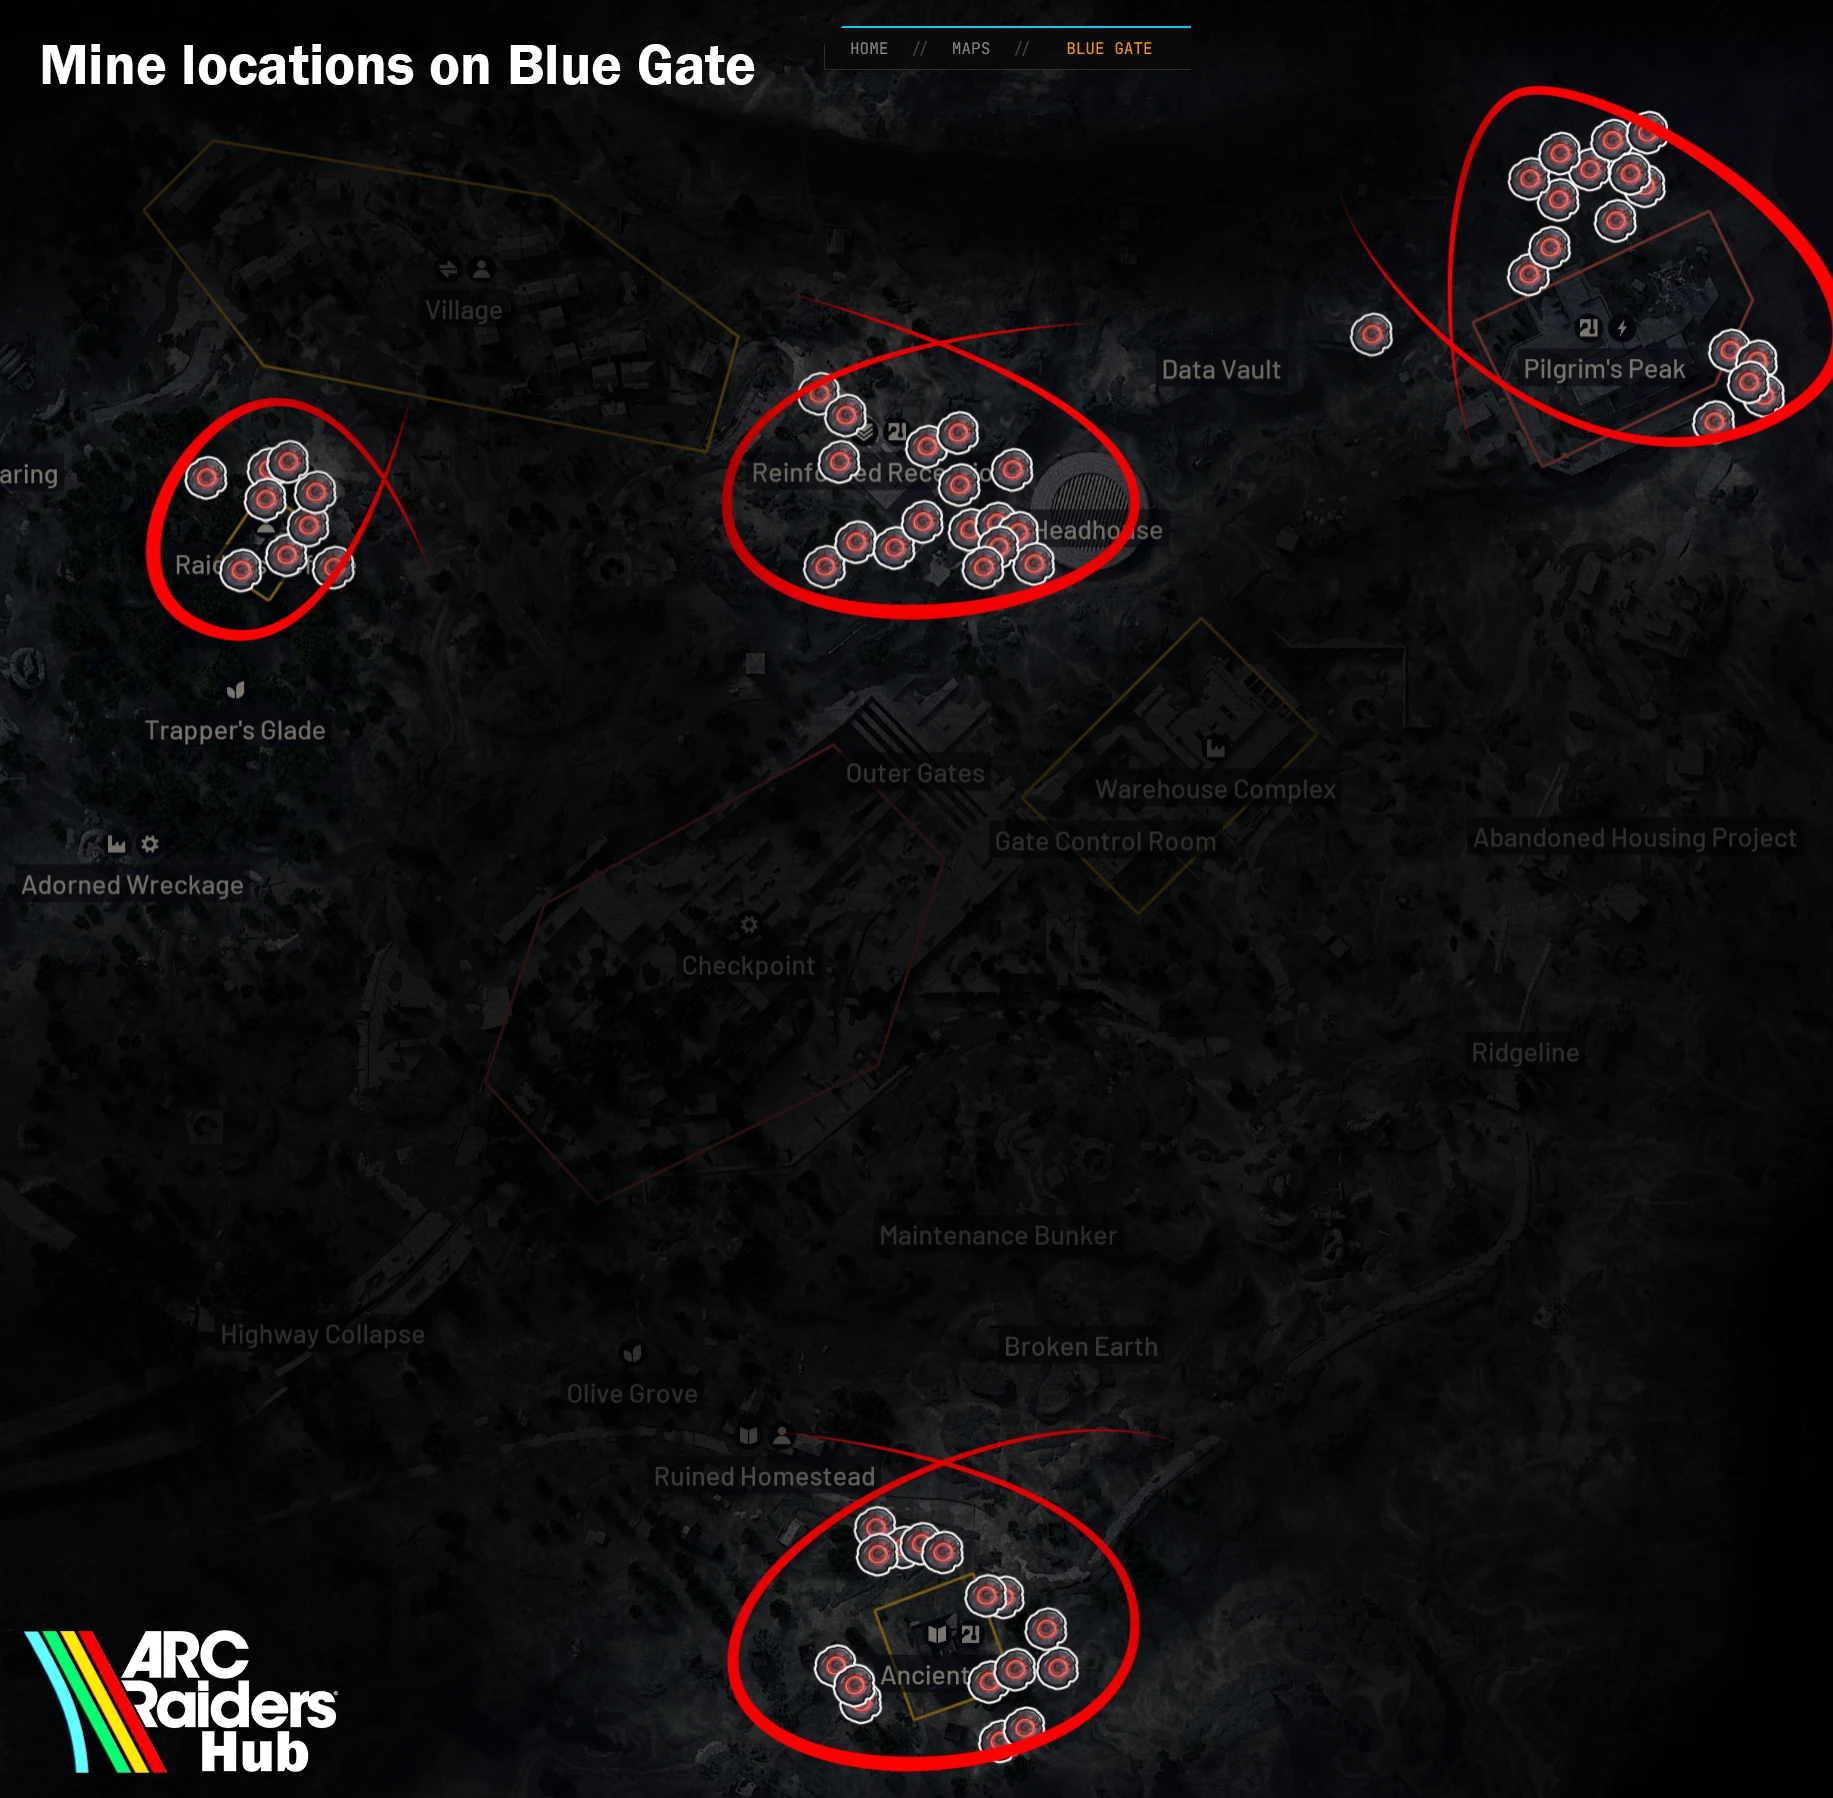
Overview of all four mine zones on Blue Gate (click to enlarge)
Solo vs. Team Strategy
Solo Play
When playing solo, follow the cluster strategy above: hit the closest mine cluster first, clear it completely, then move to the second-closest. This minimizes travel time and maximizes your score before other players reach those areas.
Team Play: Split and Conquer
Team play for trials in Arc Raiders uses shared scoring: all points earned by any team member are added to every team member's total. This makes team play significantly more effective for this trial.
Team Strategy: Maximize Points by Splitting Up
When you load into a match with your team, immediately split up and each player picks a different mine cluster. This allows you to clear multiple areas simultaneously, multiplying your total score.
Example for a 3-player team:
- Player 1: Heads to Raider's Refuge and clears all mines = 6,000 points (20 mines)
- Player 2: Heads to Pilgrim's Peak and clears all mines = 6,000 points (20 mines)
- Player 3: Heads to Reinforced Reception and clears all mines = 6,000 points (20 mines)
- Total score for all players: 18,000 points
After clearing your initial cluster, move to the fourth location (Ancient Fort in this example) or sweep back through other areas for any missed mines.
Aggression-Based Matchmaking Considerations
Arc Raiders uses aggression-based matchmaking, which affects your trial experience:
- Friendly Lobbies: If you typically play in chill/friendly lobbies, you can split up freely without worrying about PvP. Focus purely on speed and efficiency—other Raiders are less likely to engage in combat.
- Aggressive Lobbies: If you're matched into aggressive lobbies, splitting up increases PvP risk. You'll need to balance mine clearing with combat readiness. Consider staying closer together or being prepared to support teammates if they're ambushed.
Team Coordination is Critical
When splitting up to cover different mine clusters, communicate regularly about your progress and any threats. If one player dies before extracting, they get zero points—don't sacrifice team members for a few extra mines. Coordinate extraction times to ensure everyone gets out safely.
Time Management
The Locked Gate event lasts 40 minutes, giving you plenty of time to cover all four mine zones. However, you're competing with other Raiders, so speed matters.
- First 15 minutes: Most critical—hit high-density mine areas before other players clear them
- Minutes 15-30: Continue clearing your assigned cluster (team) or move to second cluster (solo)
- Final 10 minutes: Start heading toward extraction while checking remaining mine locations
You Must Extract to Score
Just like other trials, your score only counts if you successfully extract. If you die before extracting, you lose all progress for that round. Leave enough time to reach an extraction point safely—don't push for "just one more mine" if the timer is running low.
Tracking the Locked Gate Event
The Disarm Mines trial only happens during the Locked Gate event on Blue Gate. This event runs on a rotation, so you'll need to check when it's active.
Use our event tracker to see:
- Currently active events for all maps
- When Locked Gate on Blue Gate is scheduled
- Event duration timers so you know how long you have to play
Summary: Your 20K+ Checklist
Quick Reference Guide
- Check the event tracker for Locked Gate on Blue Gate
- Open the interactive map with mine filters to study spawn locations
- Bring adrenaline shots and zip lines for maximum speed
- Solo: Clear closest cluster first then move to next closest (Raider's Refuge, Pilgrim's Peak, Reinforced Reception, Ancient Fort)
- Team: Split up immediately - each player clears a different cluster. All points are shared with everyone
- Use audio cues to find hidden mines in bushes and grass
- Stay still while disarming—moving off the mine = explosion
- Target 70 mines for 20,000+ points (300 per mine)
- Extract safely—your score only counts if you survive
Video Guide
Prefer a video walkthrough? Watch this complete guide to disarming mines during the Locked Gate trial, including live gameplay showing optimal routes and techniques:
Frequently Asked Questions
Where are the mines on Blue Gate?
Buried mines spawn near the four security key locations during the Locked Gate event: Raider's Refuge, Pilgrim's Peak, Reinforced Reception, and Ancient Fort. Use our interactive map with mine filters to see all spawn locations marked.
How many mines do I need to disarm for 20,000 points?
Each mine awards 300 points, so you need to disarm approximately 67-70 mines to hit 20,000+ points in a single run.
What happens if I step off a mine while disarming?
The mine will explode, dealing significant damage or killing you. You must stay on the mine until the disarming process completes.
How do I find mines hidden in grass and bushes?
Use audio cues. Active mines emit an audible beeping sound that helps you locate them even when they're hidden by terrain or vegetation. This is especially useful for finding mines other players missed.
Can I do this trial solo or do I need a team?
Both solo and team play are viable for this trial. Team play has a significant advantage because all points earned by any team member are shared with everyone, effectively multiplying your score potential. If you run as a team, split up immediately and each player should clear a different mine cluster for maximum efficiency. Solo play works well too, especially in friendly lobbies where PvP risk is lower—just focus on clearing the closest mine cluster first, then moving to the next closest.
When can I do this trial?
The Disarm Mines trial only happens during the Locked Gate event on Blue Gate. Check our event tracker to see when Locked Gate is active.
What's the best loadout for this trial?
Prioritize speed and mobility: bring lots of adrenaline shots for movement speed, zip lines for terrain traversal, seeker grenades for dealing with ARCs, and a basic weapon with light armor. You want to travel fast, not fight.
Do I need to extract for my score to count?
Yes. Just like all weekly trials, you must successfully extract for your score to count. If you die before reaching extraction, you lose all progress for that round.
Good luck, Raiders. Move fast, listen carefully, and stay on those mines until they're disarmed.
//-Arc Raiders Hub
Share Your High Score!
Join our Discord community to share your mine disarming strategies, high scores, and coordinate with other Raiders!
Join Discord Server