

Best Skill Tree Builds: PvE, PvP and PvPvE
Pick your playstyle and get the build. Each one comes in two stages: a 76-point base that reaches its capstones, then the 15 expedition points on top. The phases below give the order to take them in if you level one point at a time: the three roots, Mobility to its first diamond, out to the other diamonds, back to Mobility, then the capstones.
PvE: the loot mule
For Raiders who avoid fights and farm. Security Breach for the lockers, every carry skill in Conditioning, and the Survival loot skills.
Phase 1: The three roots (Points 1–3)
The rebalanced tree gives every track a good one-point root, so if you're levelling one point at a time (after an expedition, say), take all three first. More max stamina is always good. In-Round Crafting lets you craft bandages from the cloth you find; you could skip it and heal with the cloth itself for less health, but it's one point. Used to the Weight matters because every shield slows you down, the heavier the shield the more, and it takes the edge off.
- Youthful Lungs (1/1) - More max stamina. One point, and it opens Mobility.
- In-Round Crafting (1/1) - Field-craft topside, like bandages from the cloth you find. One point, and it opens Survival.
- Used to the Weight (1/1) - Every shield slows you down, the heavier the shield the more; this takes the edge off. One point, and it opens Conditioning.
Phase 2: Mobility to its first diamond (Points 4–15)
About ten Mobility points unlock the track's diamond, and we take Vault Spring there. Two points into Marathon Runner while we're here, then we branch out; we come back to finish it.
- Nimble Climber (5/5) - Climb and vault faster.
- Fight or Flight (4/5) - Get stamina back when you take damage. Having stamina the moment you're shot is what gets you out.
- Vault Spring (choice node) - Jump at the end of a vault for a long leap, and it chains with the Grappling Hook. Millzaa takes it over Vaults on Vaults on Vaults, which still drained a little stamina in his test.
- Marathon Runner (2/5) - Moving around costs less stamina. Two points for now; we come back to max it.
Phase 3: Survival to Quick Roll (Points 16–25)
Branch out: ten Survival points open its diamond. Looter's Instincts pays off every raid, and Quick Roll is the cheaper dodge you'll use in every fight.
- Looter's Instincts (5/5) - Loot reveals faster when you search, whether it's a container or a downed Raider. It pays off every raid.
- Silent Scavenger (4/5) - Less noise while looting, so you pull fewer ARC, and it brings Survival to 10 for the diamond.
- Quick Roll (choice node) - A faster, cheaper dodge roll. In Millzaa's test, short rolls cost far less stamina. Minesweeper isn't a real alternative: nobody defuses mines.
Phase 4: Conditioning to Mule's Gallop and carry weight (Points 26–41)
Now Conditioning's diamond: Mule's Gallop, so a full backpack doesn't stop you sprinting. Right behind it are Loaded Arms and Broad Shoulders, the carry skills every build wants. Vault 'N' Carry comes along on the way.
- Three Deep Breaths (5/5) - Recover from exhaustion sooner: Millzaa reads it as leaving the exhausted state at 10 stamina instead of 20.
- Vigorous Vaulter (1/1) - Vaulting isn't slowed while you're exhausted, so an escape doesn't stall on a fence.
- Stubborn Mule (1/5) - Being over-encumbered hurts your stamina regen less. One point now opens the path; we come back for more.
- Vault 'N' Carry (1/1) - Vault and mantle while holding a carryable. No more drop-climb-pick-up workaround; a solo Raider doesn't need anyone to hand things up.
- Stubborn Mule (2/5) - The point that brings the track to 10 and unlocks the diamond.
- Mule's Gallop (choice node) - Sprint while over-encumbered. In Millzaa's side-by-side test, badly overloaded "sprinting" without it was slower than walking. Back on Your Feet isn't close.
- Loaded Arms (1/1) - Your equipped weapons count half toward encumbrance: almost 10 lb off a Hullcracker and Volcano loadout in his test.
- Broad Shoulders (5/5) - +10 lb carry weight, 60 to 70. Loot goblins need it, and so do PvP players hauling the guns they pick up.
Phase 5: Conditioning to Security Breach (Points 42–55)
The long commitment: the downed skills, three points of Speedy Mule, and Security Breach at 31 Conditioning points.
- Downed but Determined (5/5) - More time before you collapse when downed.
- Crawl Before You Walk (5/5) - Crawl faster while downed. With both downed skills maxed, Millzaa crawled about 80 m on half his health bar, against about 40 m on a full bar without them. Everyone goes down; this is how you reach cover or the exfil.
- Speedy Mule (3/5) - A smaller speed penalty when you're badly overloaded. Proficient Pryer is the alternative for these last points if you breach a lot.
- Security Breach (capstone) - Open Security Lockers: epic and rare weapons, and a better shot at Anvils, which are rarer now. Weapon Bash barely scratches ARC. Bull Rush does no damage but shoves people off loot, which makes it a real alternative in this week's PvE mode test: see the note below the builds.
Security Breach is the reason to run PvE, so it comes as soon as the three diamonds are open: the lockers start paying out while the rest of the stamina skills wait.
Phase 6: Back to Mobility (Points 56–68)
With Security Breach in hand, finish the Mobility skills this build uses: the rest of Marathon Runner, Effortless Roll and Swift Start. No Mobility capstone in PvE.
- Marathon Runner (5/5) - Maxed: cheaper movement all raid long.
- Effortless Roll (5/5) - Dodge rolls cost less stamina. Worth it in every build.
- Swift Start (5/5) - The speed burst at the start of every sprint lasts much longer. You feel it constantly.
Phase 7: The Survival loot engine (Points 69–76)
The last eight base points finish Survival for this build. It stops short of the Survival capstones: Road Warrior, Nomadic Crafting and Field Repair cost 30 points, and Millzaa's tests didn't find them worth it here (Nomadic Crafting only adds ammo, the Zipline and the Grappling Hook).
- Traveling Tinkerer (1/1) - More field-craft recipes, and the path to Looter's Luck.
- Looter's Luck (5/5) - A chance to reveal two items at once while looting.
- Gentle Pressure (1/5) - Quieter breaching, and one point toward A Little Extra.
- A Little Extra (1/1) - Breaching generates basic materials like ARC Alloy and metal parts. Small, but you breach a lot.
Phase 8: Expedition points: the full mule (Points 77–91)
One expedition point at a time: finish Speedy Mule first, then faster breaching, then max Stubborn Mule. The last points round off Mobility.
- Speedy Mule (5/5) - Maxed: the overload penalty mostly gone.
- Proficient Pryer (5/5) - Breach doors and containers faster.
- Stubborn Mule (5/5) - Maxed. With Mule's Gallop and Speedy Mule, a full backpack barely slows you down.
- Fight or Flight (5/5) - Maxed: a little more stamina back per hit.
- Slip and Slide (4/5) - Slide further and faster.
PvP solo: speed and escape
Mobility is the PvP tree. Sprinting on Fumes at 76, Wall Run on top with expedition points. Conditioning stops at the carry and downed skills; no capstone there helps in a fight.
Phase 1: The three roots (Points 1–3)
The rebalanced tree gives every track a good one-point root, so if you're levelling one point at a time (after an expedition, say), take all three first. More max stamina is always good. In-Round Crafting lets you craft bandages from the cloth you find; you could skip it and heal with the cloth itself for less health, but it's one point. Used to the Weight matters because every shield slows you down, the heavier the shield the more, and it takes the edge off.
- Youthful Lungs (1/1) - More max stamina. One point, and it opens Mobility.
- In-Round Crafting (1/1) - Field-craft topside, like bandages from the cloth you find. One point, and it opens Survival.
- Used to the Weight (1/1) - Every shield slows you down, the heavier the shield the more; this takes the edge off. One point, and it opens Conditioning.
Phase 2: Mobility to its first diamond (Points 4–15)
About ten Mobility points unlock the track's diamond, and we take Vault Spring there. Two points into Marathon Runner while we're here, then we branch out; we come back to finish it.
- Nimble Climber (5/5) - Climb and vault faster.
- Fight or Flight (4/5) - Get stamina back when you take damage. Having stamina the moment you're shot is what gets you out.
- Vault Spring (choice node) - Jump at the end of a vault for a long leap, and it chains with the Grappling Hook. Millzaa takes it over Vaults on Vaults on Vaults, which still drained a little stamina in his test.
- Marathon Runner (2/5) - Moving around costs less stamina. Two points for now; we come back to max it.
Phase 3: Survival to Quick Roll (Points 16–25)
Branch out: ten Survival points open its diamond. Looter's Instincts pays off every raid, and Quick Roll is the cheaper dodge you'll use in every fight. Sturdy Ankles (less fall damage) gets you there and helps when you jump off things to escape.
- Looter's Instincts (5/5) - Loot reveals faster when you search, whether it's a container or a downed Raider. It pays off every raid.
- Silent Scavenger (1/5) - One point, just to reach the Survival diamond.
- Sturdy Ankles (3/5) - Less fall damage, for jumping off things to get away from a Raider or ARC. It also counts toward the 10 Survival points Quick Roll needs.
- Quick Roll (choice node) - A faster, cheaper dodge roll. In Millzaa's test, short rolls cost far less stamina. Minesweeper isn't a real alternative: nobody defuses mines.
Phase 4: Conditioning to Mule's Gallop and carry weight (Points 26–41)
Now Conditioning's diamond: Mule's Gallop, so a full backpack doesn't stop you sprinting. Right behind it are Loaded Arms and Broad Shoulders, the carry skills every build wants.
- Three Deep Breaths (5/5) - Recover from exhaustion sooner: Millzaa reads it as leaving the exhausted state at 10 stamina instead of 20.
- Vigorous Vaulter (1/1) - Vaulting isn't slowed while you're exhausted, so an escape doesn't stall on a fence.
- Stubborn Mule (3/5) - Being over-encumbered hurts your stamina regen less, and these three points bring the track to 10 for the diamond.
- Mule's Gallop (choice node) - Sprint while over-encumbered. In Millzaa's side-by-side test, badly overloaded "sprinting" without it was slower than walking. Back on Your Feet isn't close.
- Loaded Arms (1/1) - Your equipped weapons count half toward encumbrance: almost 10 lb off a Hullcracker and Volcano loadout in his test.
- Broad Shoulders (5/5) - +10 lb carry weight, 60 to 70. Loot goblins need it, and so do PvP players hauling the guns they pick up.
Phase 5: Mobility to Sprinting on Fumes (Points 42–59)
Back to the PvP tree: finish the stamina skills and push Mobility to 30 for Sprinting on Fumes.
- Marathon Runner (5/5) - Maxed: cheaper movement all raid long.
- Effortless Roll (5/5) - Dodge rolls cost less stamina. Worth it in every build.
- Swift Start (5/5) - The speed burst at the start of every sprint lasts much longer. You feel it constantly.
- Fight or Flight (5/5) - Maxed: a little more stamina back per hit.
- Right Back at It (1/1) - Get up faster after a heavy landing; one point on the way to Off the Wall.
- Off the Wall (2/5) - Wall-leap further.
- Sprinting on Fumes (capstone) - Your stamina never fully drains while you sprint. Damage or any action cancels it, and the longer you ran on empty, the longer you're winded after; an Adrenaline Shot skips the wait. In the Flow could take over once it's fixed, but it's glitchy for now.
Phase 6: The downed skills (Points 60–69)
Conditioning stops here for PvP: Security Breach, Weapon Bash and Bull Rush don't win fights. These two let you crawl to cover or a teammate when you go down.
- Downed but Determined (5/5) - More time before you collapse when downed.
- Crawl Before You Walk (5/5) - Crawl faster while downed. With both downed skills maxed, Millzaa crawled about 80 m on half his health bar, against about 40 m on a full bar without them. Everyone goes down; this is how you reach cover or the exfil.
Phase 7: Looter's Luck and the last point (Points 70–76)
The last seven base points.
- Traveling Tinkerer (1/1) - More field-craft recipes, and the path to Looter's Luck.
- Looter's Luck (5/5) - A chance to reveal two items at once while looting.
- Off the Wall (3/5) - Wall-leap further.
Playing in a squad without expedition points yet? Take Stylish Landing 1 and Turtle Crawl 5 instead of Looter's Luck and that last Off the Wall point, so you last longer while downed.
Phase 8: Expedition points: Wall Run, then carry speed (Points 77–91)
Max Off the Wall, take Slip and Slide and one point of Sure-Footed Scrambler, and Mobility reaches 40 for Wall Run, a second capstone. Solo, the last six points go to getting out faster when you're loaded.
- Off the Wall (5/5) - Maxed, on the way to 40 Mobility for Wall Run.
- Slip and Slide (5/5) - Slide further and faster.
- Sure-Footed Scrambler (1/5) - One point opens the path to Wall Run. Maxed it only adds about two seconds of slope climbing, so one is enough.
- Wall Run (capstone) - Sprint into a wall and run up it, about twice your height at best. Great for breaking line of sight on a chaser. It needs 40 points in Mobility, which is why it waits for expedition points.
- Speedy Mule (5/5) - A smaller speed penalty when you're badly overloaded, so a full bag of looted guns doesn't trap you in the raid.
- Proficient Pryer (1/5) - Breach doors and containers faster.
PvP squad: speed, and stay alive while downed
The same base as the solo build. The last expedition points go to Turtle Crawl, so you take less damage while you wait for a revive.
Phase 1: The three roots (Points 1–3)
The rebalanced tree gives every track a good one-point root, so if you're levelling one point at a time (after an expedition, say), take all three first. More max stamina is always good. In-Round Crafting lets you craft bandages from the cloth you find; you could skip it and heal with the cloth itself for less health, but it's one point. Used to the Weight matters because every shield slows you down, the heavier the shield the more, and it takes the edge off.
- Youthful Lungs (1/1) - More max stamina. One point, and it opens Mobility.
- In-Round Crafting (1/1) - Field-craft topside, like bandages from the cloth you find. One point, and it opens Survival.
- Used to the Weight (1/1) - Every shield slows you down, the heavier the shield the more; this takes the edge off. One point, and it opens Conditioning.
Phase 2: Mobility to its first diamond (Points 4–15)
About ten Mobility points unlock the track's diamond, and we take Vault Spring there. Two points into Marathon Runner while we're here, then we branch out; we come back to finish it.
- Nimble Climber (5/5) - Climb and vault faster.
- Fight or Flight (4/5) - Get stamina back when you take damage. Having stamina the moment you're shot is what gets you out.
- Vault Spring (choice node) - Jump at the end of a vault for a long leap, and it chains with the Grappling Hook. Millzaa takes it over Vaults on Vaults on Vaults, which still drained a little stamina in his test.
- Marathon Runner (2/5) - Moving around costs less stamina. Two points for now; we come back to max it.
Phase 3: Survival to Quick Roll (Points 16–25)
Branch out: ten Survival points open its diamond. Looter's Instincts pays off every raid, and Quick Roll is the cheaper dodge you'll use in every fight. Sturdy Ankles (less fall damage) gets you there and helps when you jump off things to escape.
- Looter's Instincts (5/5) - Loot reveals faster when you search, whether it's a container or a downed Raider. It pays off every raid.
- Silent Scavenger (1/5) - One point, just to reach the Survival diamond.
- Sturdy Ankles (3/5) - Less fall damage, for jumping off things to get away from a Raider or ARC. It also counts toward the 10 Survival points Quick Roll needs.
- Quick Roll (choice node) - A faster, cheaper dodge roll. In Millzaa's test, short rolls cost far less stamina. Minesweeper isn't a real alternative: nobody defuses mines.
Phase 4: Conditioning to Mule's Gallop and carry weight (Points 26–41)
Now Conditioning's diamond: Mule's Gallop, so a full backpack doesn't stop you sprinting. Right behind it are Loaded Arms and Broad Shoulders, the carry skills every build wants.
- Three Deep Breaths (5/5) - Recover from exhaustion sooner: Millzaa reads it as leaving the exhausted state at 10 stamina instead of 20.
- Vigorous Vaulter (1/1) - Vaulting isn't slowed while you're exhausted, so an escape doesn't stall on a fence.
- Stubborn Mule (3/5) - Being over-encumbered hurts your stamina regen less, and these three points bring the track to 10 for the diamond.
- Mule's Gallop (choice node) - Sprint while over-encumbered. In Millzaa's side-by-side test, badly overloaded "sprinting" without it was slower than walking. Back on Your Feet isn't close.
- Loaded Arms (1/1) - Your equipped weapons count half toward encumbrance: almost 10 lb off a Hullcracker and Volcano loadout in his test.
- Broad Shoulders (5/5) - +10 lb carry weight, 60 to 70. Loot goblins need it, and so do PvP players hauling the guns they pick up.
Phase 5: Mobility to Sprinting on Fumes (Points 42–59)
Back to the PvP tree: finish the stamina skills and push Mobility to 30 for Sprinting on Fumes.
- Marathon Runner (5/5) - Maxed: cheaper movement all raid long.
- Effortless Roll (5/5) - Dodge rolls cost less stamina. Worth it in every build.
- Swift Start (5/5) - The speed burst at the start of every sprint lasts much longer. You feel it constantly.
- Fight or Flight (5/5) - Maxed: a little more stamina back per hit.
- Right Back at It (1/1) - Get up faster after a heavy landing; one point on the way to Off the Wall.
- Off the Wall (2/5) - Wall-leap further.
- Sprinting on Fumes (capstone) - Your stamina never fully drains while you sprint. Damage or any action cancels it, and the longer you ran on empty, the longer you're winded after; an Adrenaline Shot skips the wait. In the Flow could take over once it's fixed, but it's glitchy for now.
Phase 6: The downed skills (Points 60–69)
Conditioning stops here for PvP: Security Breach, Weapon Bash and Bull Rush don't win fights. These two let you crawl to cover or a teammate when you go down.
- Downed but Determined (5/5) - More time before you collapse when downed.
- Crawl Before You Walk (5/5) - Crawl faster while downed. With both downed skills maxed, Millzaa crawled about 80 m on half his health bar, against about 40 m on a full bar without them. Everyone goes down; this is how you reach cover or the exfil.
Phase 7: Looter's Luck and the last point (Points 70–76)
The last seven base points.
- Traveling Tinkerer (1/1) - More field-craft recipes, and the path to Looter's Luck.
- Looter's Luck (5/5) - A chance to reveal two items at once while looting.
- Off the Wall (3/5) - Wall-leap further.
No expedition points yet? Squads can take Stylish Landing 1 and Turtle Crawl 5 instead of Looter's Luck and that last Off the Wall point right away.
Phase 8: Expedition points: Wall Run, then Turtle Crawl (Points 77–91)
Max Off the Wall, take Slip and Slide and one point of Sure-Footed Scrambler, and Mobility reaches 40 for Wall Run, a second capstone. In a squad the last six points keep you alive while downed. Millzaa calls this the most used PvP tree.
- Off the Wall (5/5) - Maxed, on the way to 40 Mobility for Wall Run.
- Slip and Slide (5/5) - Slide further and faster.
- Sure-Footed Scrambler (1/5) - One point opens the path to Wall Run. Maxed it only adds about two seconds of slope climbing, so one is enough.
- Wall Run (capstone) - Sprint into a wall and run up it, about twice your height at best. Great for breaking line of sight on a chaser. It needs 40 points in Mobility, which is why it waits for expedition points.
- Stylish Landing (1/5) - One point opens the path to Turtle Crawl.
- Turtle Crawl (5/5) - Take less damage while downed, so your squad has time to revive you. Solo players skip it: nobody's coming.
PvPvE: a bit of everything
The PvE Conditioning run to Security Breach plus the PvP Mobility run to Sprinting on Fumes. Expedition points add Wall Run as a third capstone.
Phase 1: The three roots (Points 1–3)
The rebalanced tree gives every track a good one-point root, so if you're levelling one point at a time (after an expedition, say), take all three first. More max stamina is always good. In-Round Crafting lets you craft bandages from the cloth you find; you could skip it and heal with the cloth itself for less health, but it's one point. Used to the Weight matters because every shield slows you down, the heavier the shield the more, and it takes the edge off.
- Youthful Lungs (1/1) - More max stamina. One point, and it opens Mobility.
- In-Round Crafting (1/1) - Field-craft topside, like bandages from the cloth you find. One point, and it opens Survival.
- Used to the Weight (1/1) - Every shield slows you down, the heavier the shield the more; this takes the edge off. One point, and it opens Conditioning.
Phase 2: Mobility to its first diamond (Points 4–15)
About ten Mobility points unlock the track's diamond, and we take Vault Spring there. Two points into Marathon Runner while we're here, then we branch out; we come back to finish it.
- Nimble Climber (5/5) - Climb and vault faster.
- Fight or Flight (4/5) - Get stamina back when you take damage. Having stamina the moment you're shot is what gets you out.
- Vault Spring (choice node) - Jump at the end of a vault for a long leap, and it chains with the Grappling Hook. Millzaa takes it over Vaults on Vaults on Vaults, which still drained a little stamina in his test.
- Marathon Runner (2/5) - Moving around costs less stamina. Two points for now; we come back to max it.
Phase 3: Survival to Quick Roll (Points 16–25)
Branch out: ten Survival points open its diamond. Looter's Instincts pays off every raid, and Quick Roll is the cheaper dodge you'll use in every fight.
- Looter's Instincts (5/5) - Loot reveals faster when you search, whether it's a container or a downed Raider. It pays off every raid.
- Sturdy Ankles (3/5) - Less fall damage, for jumping off things to get away from a Raider or ARC. It also counts toward the 10 Survival points Quick Roll needs.
- Silent Scavenger (1/5) - One point, just to reach the Survival diamond.
- Quick Roll (choice node) - A faster, cheaper dodge roll. In Millzaa's test, short rolls cost far less stamina. Minesweeper isn't a real alternative: nobody defuses mines.
Phase 4: Conditioning to Mule's Gallop and carry weight (Points 26–41)
Now Conditioning's diamond: Mule's Gallop, so a full backpack doesn't stop you sprinting. Right behind it are Loaded Arms and Broad Shoulders, the carry skills every build wants. Vault 'N' Carry comes along on the way.
- Three Deep Breaths (5/5) - Recover from exhaustion sooner: Millzaa reads it as leaving the exhausted state at 10 stamina instead of 20.
- Vigorous Vaulter (1/1) - Vaulting isn't slowed while you're exhausted, so an escape doesn't stall on a fence.
- Stubborn Mule (1/5) - Being over-encumbered hurts your stamina regen less. One point now opens the path; we come back for more.
- Vault 'N' Carry (1/1) - Vault and mantle while holding a carryable. No more drop-climb-pick-up workaround; a solo Raider doesn't need anyone to hand things up.
- Stubborn Mule (2/5) - The point that brings the track to 10 and unlocks the diamond.
- Mule's Gallop (choice node) - Sprint while over-encumbered. In Millzaa's side-by-side test, badly overloaded "sprinting" without it was slower than walking. Back on Your Feet isn't close.
- Loaded Arms (1/1) - Your equipped weapons count half toward encumbrance: almost 10 lb off a Hullcracker and Volcano loadout in his test.
- Broad Shoulders (5/5) - +10 lb carry weight, 60 to 70. Loot goblins need it, and so do PvP players hauling the guns they pick up.
Phase 5: Mobility to Sprinting on Fumes (Points 42–59)
Back to Mobility: finish the stamina skills and push to 30 for the first capstone.
- Marathon Runner (5/5) - Maxed: cheaper movement all raid long.
- Effortless Roll (5/5) - Dodge rolls cost less stamina. Worth it in every build.
- Swift Start (5/5) - The speed burst at the start of every sprint lasts much longer. You feel it constantly.
- Fight or Flight (5/5) - Maxed: a little more stamina back per hit.
- Right Back at It (1/1) - Get up faster after a heavy landing; one point on the way to Off the Wall.
- Off the Wall (2/5) - Wall-leap further.
- Sprinting on Fumes (capstone) - Your stamina never fully drains while you sprint. Damage or any action cancels it, and the longer you ran on empty, the longer you're winded after; an Adrenaline Shot skips the wait. In the Flow could take over once it's fixed, but it's glitchy for now.
Phase 6: Conditioning to Security Breach (Points 60–73)
The second capstone: the downed skills, three points of Speedy Mule, and Security Breach at 31 Conditioning points.
- Downed but Determined (5/5) - More time before you collapse when downed.
- Crawl Before You Walk (5/5) - Crawl faster while downed. With both downed skills maxed, Millzaa crawled about 80 m on half his health bar, against about 40 m on a full bar without them. Everyone goes down; this is how you reach cover or the exfil.
- Speedy Mule (3/5) - A smaller speed penalty when you're badly overloaded. Proficient Pryer is the alternative for these last points if you breach a lot.
- Security Breach (capstone) - Open Security Lockers: epic and rare weapons, and a better shot at Anvils, which are rarer now. Weapon Bash barely scratches ARC. Bull Rush does no damage but shoves people off loot, which makes it a real alternative in this week's PvE mode test: see the note below the builds.
Two capstones at 76 is the point of this build: Sprinting on Fumes covers the PvP raids and Security Breach pays for the PvE ones. Survival gets what's left.
Phase 7: A taste of Looter's Luck (Points 74–76)
The last three base points.
- Traveling Tinkerer (1/1) - More field-craft recipes, and the path to Looter's Luck.
- Looter's Luck (2/5) - A chance to reveal two items at once while looting.
Phase 8: Expedition points: Wall Run and Looter's Luck (Points 77–91)
Mobility goes on to 40 for Wall Run, a third capstone, then Looter's Luck is maxed. The last two points go to Proficient Pryer for faster breaching, as in Millzaa's final tree; maxing Speedy Mule is the alternative.
- Off the Wall (5/5) - Maxed, on the way to 40 Mobility for Wall Run.
- Slip and Slide (5/5) - Slide further and faster.
- Sure-Footed Scrambler (1/5) - One point opens the path to Wall Run. Maxed it only adds about two seconds of slope climbing, so one is enough.
- Wall Run (capstone) - Sprint into a wall and run up it, about twice your height at best. Great for breaking line of sight on a chaser. It needs 40 points in Mobility, which is why it waits for expedition points.
- Looter's Luck (5/5) - Maxed: the best odds of a double reveal.
- Proficient Pryer (2/5) - Breach doors and containers faster.
PvE mode test: Security Breach or Bull Rush?
This week's PvE toggle test (October 13–20) turns the Conditioning capstone into a real choice for the PvE and PvPvE builds.
- Security Breach lets you breach Security Lockers, which most Raiders can't open, so more containers are open to you in general.
- Bull Rush lets you defend your loot when nobody can shoot anybody. It does no damage and doesn't stun, but it knocks Raiders back and stops whatever they're doing, and we've tested that it works in PvE mode. Charge Raiders out of a doorway they're blocking. If someone walks into the key room you just unlocked and goes for the best container, or starts looting the Emperor payload you called with the Redirection map condition, Bull Rush stops them looting, and then you can open it yourself.
It's a tough call, and it will take time to see how people behave in PvE mode. If you have enough Coins not to sweat a skill tree reset, try Bull Rush and reset if you don't like it.
What the testing showed
These builds are inspired by a YouTube video by Millzaa, who tested the key skills in raids before choosing them. The 76- and 91-point results are his; the order is ours, so a Raider levelling after a reset (or after an expedition) always knows the next point worth taking. What his tests found:
- Crawl Before You Walk + Downed but Determined roughly double how far you crawl when downed (about 40 m without them, 80 m on half the health bar with them). All four builds take both.
- Mule's Gallop + Speedy Mule: badly over-encumbered without them, walking is faster than "sprinting". With them you move almost normally.
- Sprinting on Fumes leaves you exhausted for a long time after a long run; an Adrenaline Shot skips the wait.
- Vault Spring over Vaults on Vaults on Vaults: the second one still drained a little stamina in his test.
- Quick Roll over Minesweeper: short rolls cost much less stamina; nobody really defuses mines.
- Road Warrior about doubled ARC Powercells and gave more ammo from ARC, and lets you recycle at full efficiency topside. It shines on ARC that drop launcher or energy ammo, but costs 30 Survival points, so no build here takes it.
- Nomadic Crafting only adds ammo, the Zipline and the Grappling Hook to field crafting.
- Field Repair doesn't apply your expedition repair bonus in a round, so it's worth less once you've done expeditions.
- Weapon Bash barely hurts ARC. Bull Rush does no damage but interrupts what the target is doing (looting, extracting) and costs a lot of stamina.
- Sure-Footed Scrambler maxed adds about two seconds of climbing on steep slopes. The builds only take one point, to reach Wall Run.
Where to use Security Breach
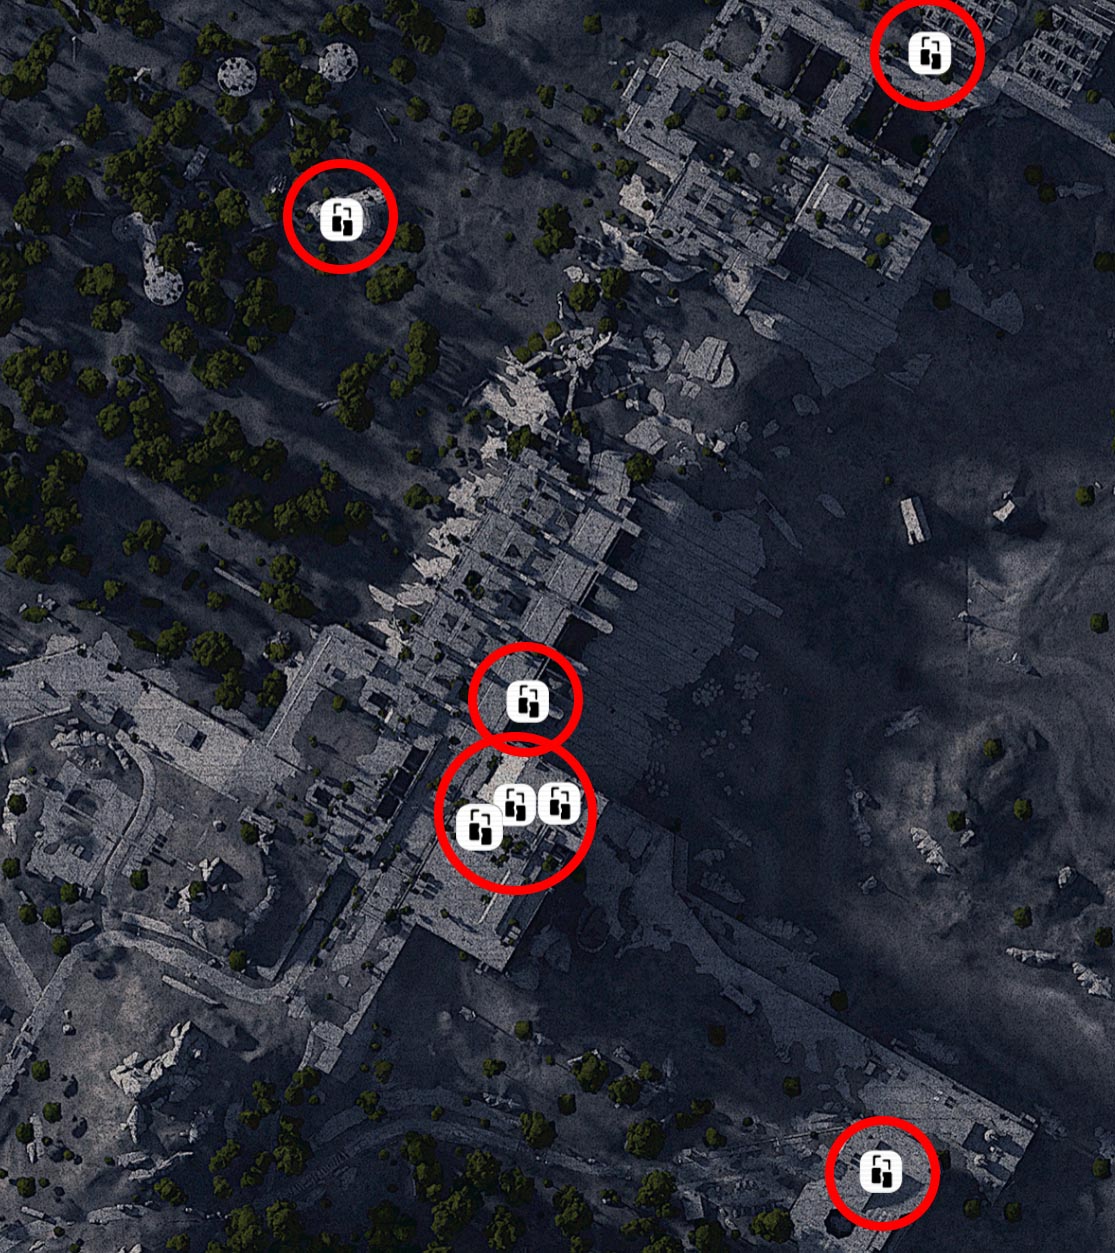
How the Frozen Trail tree works
- Choice nodes gate each track. The middle diamond opens at 10 points in its track (pick one of two skills). The two end diamonds open at 30 and 40 points and share a pool of three capstones.
- 76 points without expeditions, 91 with all of them. That's two 30-point capstones at 76, and a 40-point second capstone in one track once the expedition points are in.
- Want something else? See what other Raiders run in community builds, or press "Customize this build" to start from one of these.
Builds inspired by a YouTube video by Millzaa. Early-access details (Security Lockers in Pendola Pass) also come from videos by The Gaming Merchant and Diggy.
📚 Check Out Our Other Guides
Want to level up your Arc Raiders gameplay even more? Explore our other in-depth guides:
Have questions about this skill progression? Want to share your own build? Join our Discord community to discuss strategies with other Raiders!
Join our Discord